
![]()
![]()
This tutorial teaches FIWARE users how to architect and design a system based on linked data and to alter linked data context programmatically. The tutorial extends the knowledge gained from the equivalent NGSI-v2 tutorial and enables a user understand how to write code in an NGSI-LD capable Node.js Express application in order to retrieve and alter context data. This removes the need to use the command-line to invoke cUrl commands.
The tutorial is mainly concerned with discussing code written in Node.js, however some results can be checked by making cUrl commands. Postman documentation for the same commands is also available.

![]()
Working with Linked Data Entities
- “This is the house that Jack built.
- This is the malt that lay in the house that Jack built.
- This is the rat that ate the malt
That lay in the house that Jack built.- This is the cat
That killed the rat that ate the malt
That lay in the house that Jack built.- This is the dog that chased the cat
That killed the rat that ate the malt
That lay in the house that Jack built.”― This Is the House That Jack Built, Traditional English Nursery Rhyme
NGSI-LD is an evolution of NGSI-v2, so it should not be surprising that Smart solutions based on NGSI-LD will need to cover the same basic scenarios as outlined in the previous NGSI-v2 tutorial on programatic data access.
NGSI-LD Linked data formalizes the structure of context entities to a greater degree, through restricting data attributes to be defined as either Property attributes or Relationship attributes only. This means that it is possible to traverse the context data graph with greater certainty when moving from one Relationship to another. All the context data entities within the system are defined by JSON-LD data models, which are formally defined by referencing a context file, and this programmatic definition should guarantee that the associated linked entity exists.
Three basic data access scenarios for the supermarket are defined below:
- Reading Data - e.g. Give me all the data for the Building entity
urn:ngsi-ld:Building:store001 - Aggregation - e.g. Combine the Products entities sold in Building
urn:ngsi-ld:Building:store001and display the goods for sale - Altering context within the system - e.g. Make a sale of a product:
- Update the daily sales records by the price of the Product
- decrement the
numberOfItemsof the Shelf entity - Create a new Transaction Log record showing the sale has occurred
- Raise an alert in the warehouse if less than 10 objects remain on sale
- etc.
Further, advanced scenarios will be covered in later tutorials.
Linked Data Entities within a stock management system
The supermarket data created in the previous tutorial will be loaded into the context broker. The existing relationships between the entities are defined as shown below:
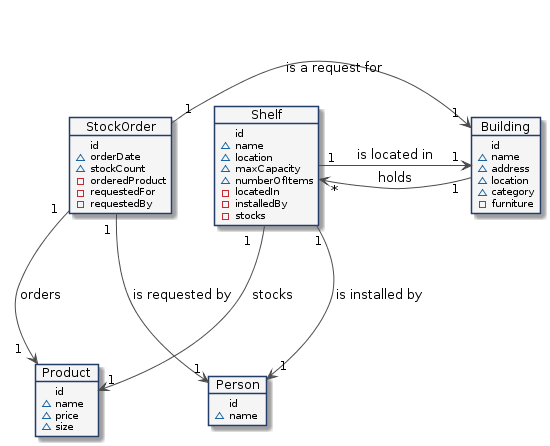
The Building, Product, Shelf and StockOrder entities will be used to display data on the frontend of our demo application.
The teaching goal of this tutorial
The aim of this tutorial is to improve developer understanding of programmatic access of context data through defining and discussing a series of generic code examples covering common data access scenarios. For this purpose a simple Node.js Express application will be created.
The intention here is not to teach users how to write an application in Express - indeed any language could have been chosen. It is merely to show how any sample programming language could be used alter the context to achieve the business logic goals.
Obviously, your choice of programming language will depend upon your own business needs - when reading the code below please keep this in mind and substitute Node.js with your own programming language as appropriate.
Stock Management Frontend
All the code Node.js Express for the demo can be found within the ngsi-ld folder within the GitHub repository.
Stock Management example. The application
runs on the following URLs:
http://localhost:3000/app/store/urn:ngsi-ld:Building:store001http://localhost:3000/app/store/urn:ngsi-ld:Building:store002http://localhost:3000/app/store/urn:ngsi-ld:Building:store003http://localhost:3000/app/store/urn:ngsi-ld:Building:store004
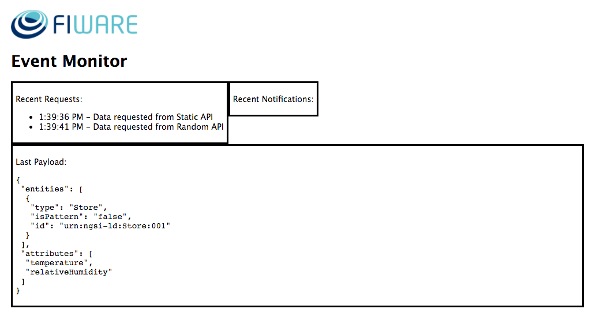
Tip Additionally, you can also watch the status of recent requests yourself by following the container logs or viewing information on
localhost:3000/app/monitoron a web browser.
Architecture
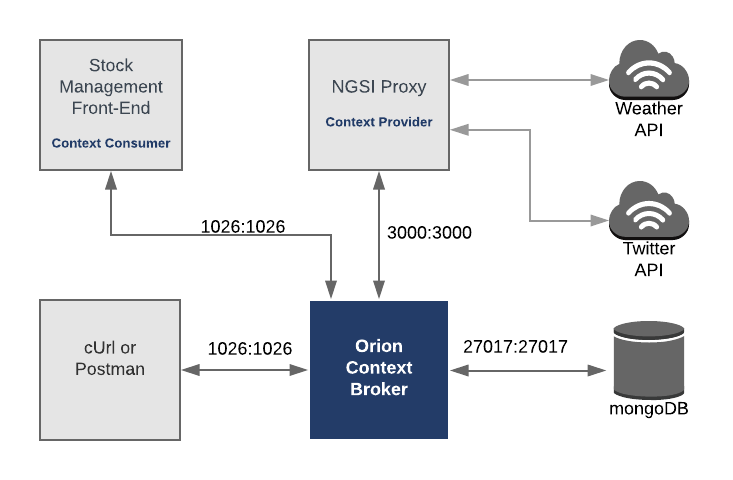
The demo Supermarket application will send and receive NGSI-LD calls to a compliant context broker. Since the NGSI-LD interface is available on an experimental version of the Orion Context Broker, the demo application will only make use of one FIWARE component.
Currently, the Orion Context Broker relies on open source MongoDB technology to keep persistence of the context data it holds. To request context data from external sources, a simple Context Provider NGSI proxy has also been added. To visualize and interact with the Context we will add a simple Express application.
Therefore, the architecture will consist of three elements:
- The Context Broker which will receive requests using NGSI-LD
- An HTTP Web-Server which offers static
@contextfiles defining the context entities within the system for both English and Japanese Users. - The underlying MongoDB database :
- Used by the Orion Context Broker to hold context data information such as data entities, subscriptions and registrations
- The Stock Management Frontend which will:
- Display store information
- Show which products can be bought at each store
- Allow users to "buy" products and reduce the stock count.
Since all interactions between the elements are initiated by HTTP requests, the entities can be containerized and run from exposed ports.
The necessary configuration information for the Context Provider NGSI proxy can be seen in the services section the
of the associated orion-ld.yml file:
Tutorial Configuration
tutorial:
    image: quay.io/fiware/tutorials.context-provider
    hostname: context-provider
    container_name: fiware-tutorial
    networks:
        - default
    expose:
        - '3000'
    ports:
        - '3000:3000'
    environment:
        - 'DEBUG=tutorial:*'
        - 'WEB_APP_PORT=3000'
        - 'NGSI_VERSION=ngsi-ld'
        - 'CONTEXT_BROKER=http://orion:1026/ngsi-ld/v1'
The tutorial container is driven by environment variables as shown:
| Key | Value | Description |
|---|---|---|
| DEBUG | tutorial:* |
Debug flag used for logging |
| WEB_APP_PORT | 3000 |
Port used by the Context Provider NGSI proxy and web-app for viewing data |
| CONTEXT_BROKER | http://orion:1026/ngsi-ld/v1 |
URL of the context broker to connect to update context |
The other tutorial container configuration values described in the YAML file are not used in this section of the
tutorial.
The configuration information for MongoDB and the Orion Context Broker has been described in a previous tutorial.
Start Up
All services can be initialised from the command-line by running the services Bash script provided within the repository. Please clone the repository and create the necessary images by running the commands as shown:
#!/bin/bash
git clone https://github.com/FIWARE/tutorials.Working-with-Linked-Data.git
cd tutorials.Working-with-Linked-Data
git checkout NGSI-v2

./services orion|scorpio|stellio
Note: If you want to clean up and start over again you can do so with the following command:
./services stop
Traversing Linked Data Programmatically
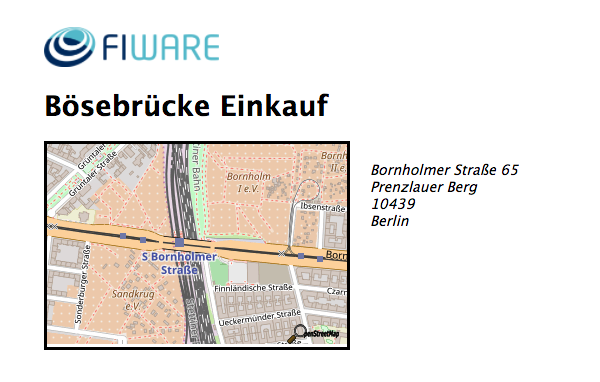
Goto http://localhost:3000/app/store/urn:ngsi-ld:Building:store001 to display and interact with the working
Supermarket data application.
Reading Linked Data
The code under discussion can be found within the ngsi-ld/store controller in the
Git Repository.
Initializing the library
As usual, the code for HTTP access can be split out from the business logic of the Supermarket application itself. The
lower level calls have been placed into a library file, which simplifies the codebase. This needs to be included in the
header of the file as shown. Some constants are also required - for the Supermarket data, the LinkHeader is used to
define location of the data models JSON-LD context (which) as http://context/ngsi-context.jsonld.
const ngsiLD = require('../../lib/ngsi-ld');

const LinkHeader =
    '<http://context/ngsi-context.jsonld>; rel="http://www.w3.org/ns/json-ld#context"; type="application/ld+json">';
Retrieve a known Store
This example reads the context data of a given Store entity to display the results on screen. Reading entity data
can be done using the ngsiLD.readEntity() method - this will fill out the URL for the GET request and make the
necessary HTTP call in an asynchronous fashion:
async function displayStore(req, res) {
    const store = await ngsiLD.readEntity(
        req.params.storeId,
        { options: 'keyValues' },
        ngsiLD.setHeaders(req.session.access_token, LinkHeader)
    );

    return res.render('store', { title: store.name, store });
}
The function above also sends some standard HTTP Headers as part of the request - these are defined in the
setHeaders() function.
Within an NGSI-LD-based system, the usual default HTTP headers would include a Link header to send the JSON-LD context
and a Content-Type header to identify the request as application/ld+json (note that every NGSI-LD request is valid
JSON_LD since NGSI-LD is a subset of JSON-LD). Other additional headers such as X-Auth-Token can be added to enable
OAuth2 security.
function setHeaders(accessToken, link, contentType) {
    const headers = {};
    if (accessToken) {
        headers['X-Auth-Token'] = accessToken;
    }
    if (link) {
        headers.Link = link;
    }
    if (contentType) {
        headers['Content-Type'] = contentType || 'application/ld+json';
    }
    return headers;
}
Within the lib/ngsi-ld.js library file, the BASE_PATH defines the location of the Orion Context Broker, reading a
data entity is simply a wrapper around an asynchronous HTTP GET request passing the appropriate headers.
const BASE_PATH = process.env.CONTEXT_BROKER || 'http://localhost:1026/ngsi-ld/v1';

function readEntity(entityId, opts, headers = {}) {
    return request({
        qs: opts,
        url: BASE_PATH + '/entities/' + entityId,
        method: 'GET',
        headers,
        json: true
    });
}
The equivalent cUrl statement can be seen below:
curl -G -X GET 'http://localhost:1026/ngsi-ld/v1/entities/urn:ngsi-ld:Building:store001/' \
-H 'Link: <http://context/ngsi-context.jsonld>; rel="http://www.w3.org/ns/json-ld#context"; type="application/ld+json"' \
-H 'Content-Type: application/json' \
-d 'options=keyValues'
And the response from the broker is:
{
    "id": "urn:ngsi-ld:Building:store001",
    "type": "Building",
    "category": {
        "vocab": "commercial"
    },
    "address": {
        "streetAddress": "Bornholmer Straße 65",
        "addressRegion": "Berlin",
        "addressLocality": "Prenzlauer Berg",
        "postalCode": "10439"
    },
    "location": {
        "type": "Point",
        "coordinates": [13.3986, 52.5547]
    },
    "name": "Bösebrücke Einkauf",
    "furniture": ["urn:ngsi-ld:Shelf:unit001", "urn:ngsi-ld:Shelf:unit002", "urn:ngsi-ld:Shelf:unit003"]
}
Aggregating and Traversing Linked Data
To display information at the till, it is necessary to discover information about the products found within a Store. From the Data Entity diagram we can ascertain that:
- Building entities hold related Shelf information within the
furnitureRelationship. - Shelf entities hold related Product information within the
stocksRelationship. - Products hold
nameandpriceas Property attributes of the Product entity itself.
Therefore, the code for the displayTillInfo() method will consist of the following steps.
- Make a request to the Context Broker to find shelves within a known store.
- Reduce the result to a
idparameter and make a second request to the Context Broker to retrieve stocked products from shelves. - Reduce the result to a
idparameter and make a third request to the Context Broker to retrieve product details for selected shelves.
To users familiar with database joins, it may seem strange being forced to make a series of requests like this, however it is necessary due to scalability issues/concerns in a large distributed setup. Direct join requests are not possible with NGSI-LD.
Find Shelves within a known Store
To access the furniture attribute of a known Building entity, a keyValues request is made using the attrs
parameter.
const building = await ngsiLD.readEntity(
    req.params.storeId,
    {
        type: 'Building',
        options: 'keyValues',
        attrs: 'furniture'
    },
    ngsiLD.setHeaders(req.session.access_token, LinkHeader)
);
The equivalent cUrl statement can be seen below:
curl -G -X GET 'http://localhost:1026/ngsi-ld/v1/entities/urn:ngsi-ld:Building:store001/' \
-H 'Link: <http://context/ngsi-context.jsonld>; rel="http://www.w3.org/ns/json-ld#context"; type="application/ld+json"' \
-H 'Content-Type: application/json' \
-d 'options=keyValues' \
-d 'attrs=furniture'
And the response from the broker is:
{
    "id": "urn:ngsi-ld:Building:store001",
    "type": "Building",
    "furniture": ["urn:ngsi-ld:Shelf:unit001", "urn:ngsi-ld:Shelf:unit002", "urn:ngsi-ld:Shelf:unit003"]
}
The response is a JSON Object which includes a furniture attribute which can be manipulated further.
Retrieve Stocked Products from shelves
To retrieve a series of Shelf entities, the ngsiLD.listEntities() function is called and filtered using the id
parameter. The id is just a comma separated list taken from the request above.
let productsList = await ngsiLD.listEntities(
    {
        type: 'Shelf',
        options: 'keyValues',
        attrs: 'stocks,numberOfItems',
        id: building.furniture.join(',')
    },
    ngsiLD.setHeaders(req.session.access_token, LinkHeader)
);
listEntities() is another function within the lib/ngsi-ld.js library file
function listEntities(opts, headers = {}) {
    return request({
        qs: opts,
        url: BASE_PATH + '/entities',
        method: 'GET',
        headers,
        json: true
    });
}
The equivalent cUrl statement can be seen below:
curl -G -X GET 'http://localhost:1026/ngsi-ld/v1/entities/' \
-H 'Link: <http://context/ngsi-context.jsonld>; rel="http://www.w3.org/ns/json-ld#context"; type="application/ld+json"' \
-H 'Content-Type: application/json' \
-H 'Accept: application/json' \
-d 'type=Shelf' \
-d 'options=keyValues' \
-d 'attrs=stocks,numberOfItems' \
-d 'id=urn:ngsi-ld:Shelf:unit001,urn:ngsi-ld:Shelf:unit002,urn:ngsi-ld:Shelf:unit003'
The response is a JSON Array of Shelf entities which includes as stocks attribute which can be manipulated
further.
[
    {
        "id": "urn:ngsi-ld:Shelf:unit001",
        "type": "Shelf",
        "numberOfItems": 15,
        "stocks": "urn:ngsi-ld:Product:001"
    },
    {
        "id": "urn:ngsi-ld:Shelf:unit002",
        "type": "Shelf",
        "numberOfItems": 15,
        "stocks": "urn:ngsi-ld:Product:003"
    },
    {
        "id": "urn:ngsi-ld:Shelf:unit003",
        "type": "Shelf",
        "numberOfItems": 15,
        "stocks": "urn:ngsi-ld:Product:004"
    }
]
The code below extracts the IDs for later use.
const stockedProducts = [];

productsList = _.groupBy(productsList, (e) => {
    return e.stocks;
});
_.forEach(productsList, (value, key) => {
    stockedProducts.push(key);
});
Retrieve Product Details for selected shelves
To retrieve a series of Product entities, the ngsiLD.listEntities() function is once again called and filtered
using the id parameter. The id is just a comma separated list taken from the request above.
let productsInStore = await ngsiLD.listEntities(
    {
        type: 'Product',
        options: 'keyValues',
        attrs: 'name,price',
        id: stockedProducts.join(',')
    },
    headers
);
The equivalent cUrl statement can be seen below:
curl -G -X GET 'http://localhost:1026/ngsi-ld/v1/entities/' \
-H 'Link: <http://context/ngsi-context.jsonld>; rel="http://www.w3.org/ns/json-ld#context"; type="application/ld+json"' \
-H 'Content-Type: application/json' \
-H 'Accept: application/json' \
-d 'type=Product' \
-d 'options=keyValues' \
-d 'attrs=name,price' \
-d 'id=urn:ngsi-ld:Product:001,urn:ngsi-ld:Product:003,urn:ngsi-ld:Product:004'
The response is a JSON Array of Product entities which are then displayed on screen:
[
    {
        "id": "urn:ngsi-ld:Product:001",
        "type": "Product",
        "price": 0.99,
        "name": "Apples"
    },
    {
        "id": "urn:ngsi-ld:Product:003",
        "type": "Product",
        "price": 14.99,
        "name": "Coconuts"
    },
    {
        "id": "urn:ngsi-ld:Product:004",
        "type": "Product",
        "price": 50,
        "name": "Melons"
    }
]
Updating Linked Data
Find a shelf stocking a product
To retrieve a series of Shelf entities, the ngsiLD.listEntities() function is called. It is important to retrieve
the current context before amending it, so the q parameter is used to only retrieve a shelf from the correct store
containing the correct product. This request is only possible because the Shelf data model has been designed to hold
relationships with both Building and Product.
const shelf = await ngsiLD.listEntities(
    {
        type: 'Shelf',
        options: 'keyValues',
        attrs: 'stocks,numberOfItems',
        q: 'numberOfItems>0;locatedIn=="' + req.body.storeId + '";stocks=="' + req.body.productId + '"',
        limit: 1
    },
    headers
);
The equivalent cUrl statement can be seen below:
curl -G -X GET 'http://localhost:1026/ngsi-ld/v1/entities/' \
-H 'Link: <http://context/ngsi-context.jsonld>; rel="http://www.w3.org/ns/json-ld#context"; type="application/ld+json"' \
-H 'Accept: application/json' \
-d 'type=Shelf' \
-d 'options=keyValues' \
-d 'q=numberOfItems%3E0;locatedIn==%22urn:ngsi-ld:Building:store001%22;stocks==%22urn:ngsi-ld:Product:001%22'
And the response from the broker is the following with nine shelves:
[
    {
        "id": "urn:ngsi-ld:Shelf:unit001",
        "type": "Shelf",
        "location": {
            "type": "Point",
            "coordinates": [
                13.398611,
                52.554699
            ]
        },
        "maxCapacity": 50,
        "numberOfItems": 15,
        "name": "Corner Unit",
        "stocks": "urn:ngsi-ld:Product:001",
        "locatedIn": "urn:ngsi-ld:Building:store001"
    }

    ...etc
]
Update the state of a shelf
To update an entity, a PATCH request is made using the id of the Shelf returned in the previous request.
const count = shelf[0].numberOfItems - 1;
await ngsiLD.updateAttribute(
    shelf[0].id,
    { numberOfItems: { type: 'Property', value: count } },
    ngsiLD.setHeaders(req.session.access_token, LinkHeader)
);
The asynchronous PATCH request is found in the updateAttribute() function within the lib/ngsi-ld.js library file:
function updateAttribute(entityId, body, headers = {}) {
    return request({
        url: BASE_PATH + '/entities/' + entityId + '/attrs',
        method: 'PATCH',
        body,
        headers,
        json: true
    });
}
The equivalent cUrl statement can be seen below:
curl -X PATCH 'http://localhost:1026/ngsi-ld/v1/entities/urn:ngsi-ld:Shelf:unit001/attrs' \
-H 'Link: <http://context/ngsi-context.jsonld>; rel="http://www.w3.org/ns/json-ld#context"; type="application/ld+json"' \
-H 'Content-Type: application/json' \
-d '{ "numberOfItems": { "type": "Property", "value": 10 } }'
And the response is an HTTP 204 status code with no data.
Interoperability using Linked Data
The introduction of Linked Data concepts to NGSI has so far marginally increased the complexity of all the context broker requests, and we have not yet demonstrated additional benefit. The idea behind linked data is to improve data interoperability and remove data silos.
As a demonstration of this, imagine we which to incorporate context data entities from another context provider who is
using a different schema. Rather than using name, category, location etc, our Japanese context provider is using
data attributes based on Kanji characters.
The English user NGSI-LD @context defines that name = https://schema.org/name, similarly for a Japanese user we
can define 名前 = https://schema.org/name and introduce alternate mappings for attribute names and enumerated
values.
Provided that two systems can agree upon a common system of unique URIs for data interchange, they are free to locally re-interpret those values within their own domain.
Creating an Entity using an Alternate Schema
An alternative Japanese JSON-LD @context file has been created and published to a web server. Within the docker
network, the file can be found here:
http://context/japanese-user-context.jsonld. Alternate data mappings can
be found for all attribute names used within the tutorials.
Note: For comparision the standard tutorial JSON-LD
@contextfile can be found here:https://fiware.github.io/tutorials.Step-by-Step/tutorials-context.jsonld
1 Request:
When creating a data entity, short names for all the URIs mapped in the Japanese JSON-LD @context can be used freely
in the payload of the request.
As can be seen in the example below, attribute names and enumerated values (such as ビル = Building) can be used
throughout. The NGSI-LD specification mandates that the attributes defined in the NGSI-LD API (i.e. the core @context)
are used to define the attributes. Therefore, elements of the request such as id type and Property remain
unchanged, although as we will see below this can be circumvented.
Our Japanese context provider can create a new Building using the request below, the Link header is pointing to the
Japanese JSON-LD @context file which supplies the full URIs for the attribute names and enumerations.
curl -L -X POST 'http://localhost:1026/ngsi-ld/v1/entities/' \
-H 'Content-Type: application/ld+json' \
--data-raw '{
    "id": "urn:ngsi-ld:Building:store005",
    "type": "ビル",
    "カテゴリー": {
        "type": "VocabProperty",
        "vocab": ["コマーシャル"]
    },
    "住所": {
        "type": "Property",
        "value": {
            "streetAddress": "Eisenacher Straße 98",
            "addressRegion": "Berlin",
            "addressLocality": "Marzahn",
            "postalCode": "12685"
        }
    },
    "場所": {
        "type": "GeoProperty",
        "value": {
             "type": "Point",
             "coordinates": [13.5646, 52.5435]
        }
    },
    "名前": {
        "type": "Property",
        "value": "Yuusui-en"
    },
    "@context":"http://context/japanese-user-context.jsonld"
}'
And the response is an HTTP 201 status code with no data.
Note that in this example the name and address have been supplied as simple strings - JSON-LD does support a
LanguageProperty @lang definition to allow for internationalization, but this is an advanced topic which will not
be discussed here. Note that the category/ カテゴリー has been defined using a VocabProperty, so that the
enumerated value commercial/ "コマーシャル can also be amended via the @context.
Reading an Entity using the default schema
Within the context broker the full URIs are used to refer to the attributes and enumerations. Even though it uses
different attribute short names, the Japanese JSON-LD @context file agrees with the standard tutorial context about
the full URIs used for a Building entity - effectively it is using the same data model.
Therefore it is possible to request the new Building (created using the Japanese data model) and have it return
using the short names specified in the standard English User JSON-LD @context, this is done by supplying the Link
header is pointing to the tutorial JSON-LD @context file.
2️⃣ Request:
curl -L -X GET 'http://localhost:1026/ngsi-ld/v1/entities/urn:ngsi-ld:Building:store005' \
-H 'Content-Type: application/json' \
-H 'Link: <http://context/ngsi-context.jsonld>; rel="http://www.w3.org/ns/json-ld#context"; type="application/ld+json"'
Response:
Tip: Use jq to format the JSON responses in this tutorial. Pipe the result by appending
| jq '.'
The response is an ordinary Building entity which standard attribute names (such as name and location and it
also returns the standard enumeration for Building category.
{
    "id": "urn:ngsi-ld:Building:store005",
    "type": "Building",
    "category": {
        "type": "VocabProperty",
        "vocab": "commercial"
    },
    "address": {
        "type": "Property",
        "value": {
            "streetAddress": "Eisenacher Straße 98",
            "addressRegion": "Berlin",
            "addressLocality": "Marzahn",
            "postalCode": "12685"
        }
    },
    "location": {
        "type": "GeoProperty",
        "value": {
            "type": "Point",
            "coordinates": [13.5646, 52.5435]
        }
    },
    "name": {
        "type": "Property",
        "value": "Yuusui-en"
    }
}
This means that our Supermarket application is able to display the new building without any modification to the underlying codebase. The data is interoperable.
Goto http://localhost:3000/app/store/urn:ngsi-ld:Building:store005 to show that the new Building can be displayed:
Reading an Entity using an alternate schema
With one exception, there is no hierarchy defined within NGSI-LD @context files - any defined @context is therefore
possible to read any of the existing Building entities and apply the Japanese @context. The @context to used is
supplied in the Link header.
3️⃣ Request:
curl -L -X GET 'http://localhost:1026/ngsi-ld/v1/entities/urn:ngsi-ld:Building:store003' \
-H 'Content-Type: application/json' \
-H 'Link: <http://context/japanese-user-context.jsonld>; rel="http://www.w3.org/ns/json-ld#context"; type="application/ld+json"'
Response:
The response is mixed - it uses attribute names and enumerations defined in japanese-context.jsonld with some
exceptions. NGSI-LD is not JSON-LD, in that the core context is always applied after the contexts received in the
Link header. Since location is a reserved attribute name, it is always supplied using the default core context.
{
    "id": "urn:ngsi-ld:Building:store003",
    "type": "ビル",
    "カテゴリー": {
        "type": "VocabProperty",
        "vocab": "コマーシャル"
    },
    "住所": {
        "type": "Property",
        "value": {
            "streetAddress": "Mühlenstrasse 10",
            "addressRegion": "Berlin",
            "addressLocality": "Friedrichshain",
            "postalCode": "10243"
        },
        "検証済み": {
            "type": "Property",
            "value": false
        }
    },
    "location": {
        "type": "GeoProperty",
        "value": {
            "type": "Point",
            "coordinates": [13.4447, 52.5031]
        }
    },
    "名前": {
        "type": "Property",
        "value": "East Side Galleria"
    },
    "家具": {
        "type": "Relationship",
        "object": ["urn:ngsi-ld:Shelf:unit006", "urn:ngsi-ld:Shelf:unit007", "urn:ngsi-ld:Shelf:unit008"]
    }
}
Applying Entity Expansion/Compaction
The Within JSON-LD there is a standard mechanism for applying and altering local attribute names. The response from the context broker will always be valid NGSI-LD. NGSI-LD is just a structured subset of JSON-LD, so further changes can be made to use the data received as JSON.
If we need to override the core NGSI-LD context, we can apply an additional expansion/compaction operation over the response to retrieve the data in a fully converted fashion for local use.
JSON-LD libraries already exist to do this work.
const coreContext = require('./jsonld-context/ngsi-ld.json');
const japaneseContext = require('./jsonld-context/japanese.json');

function translateRequest(req, res) {
    request({
        url: BASE_PATH + req.path,
        method: req.method,
        headers: req.headers,
        qs: req.query,
        json: true
    })
        .then(async function (cbResponse) {
            cbResponse['@context'] = coreContext;
            const expanded = await jsonld.expand(cbResponse);
            const compacted = await jsonld.compact(expanded, japaneseContext);
            delete compacted['@context'];
            return res.send(compacted);
        })
        .catch(function (err) {
            return res.send(err);
        });
}
4️⃣ Request:
A /japanese endpoint has been created which forwards a request to the context broker and then applies an
expansion/compaction operation.
curl -L -X GET 'http://localhost:3000/japanese/ngsi-ld/v1/entities/urn:ngsi-ld:Building:store005' \
-H 'Accept: application/ld+json'
Response:
The response after the expansion/compaction operation is data which now uses all of the preferred attribute names - this is no longer valid NGSI-LD, but would be of use if the receiving system requests data in this format.
Note that the reverse expansion/compaction operation could be used to convert this JSON back into a valid NGSI-LD payload before sending data to the context broker.
{
    "識別子": "urn:ngsi-ld:Building:store005",
    "タイプ": "ビル",
    "住所": {
        "タイプ": "プロパティ",
        "値": {
            "addressLocality": "Marzahn",
            "addressRegion": "Berlin",
            "postalCode": "12685",
            "streetAddress": "Eisenacher Straße 98"
        }
    },
    "名前": {
        "タイプ": "プロパティ",
        "値": "Yuusui-en"
    },
    "場所": {
        "タイプ": "ジオプロパティ",
        "値": {
            "タイプ": "場",
            "座標": [13.5646, 52.5435]
        }
    },
    "カテゴリー": {
        "タイプ": "グロッサリープロパティ",
        "語彙": "コマーシャル"
    }
}
It is worth noting that the subattributes of address / 住所" were left undefined by the @context files and
therefore have remained unconverted. Both address and 住所" are mapped to the same URI http://schema.org/address,
it would have been possible to include additional mappings for the subattributes using the schema.org ontology as shown:
{
    "@context": {
        "addressLocality": "http://schema.org/addressLocality",
        "addressRegion": "http://schema.org/addressRegion",
        "postalCode": "http://schema.org/postalCode",
        "streetAddress": "http://schema.org/streetAddress"
    }
}
and their equivalents in Japanese:
{
    "@context": {
        "地方": "http://schema.org/addressLocality",
        "地域": "http://schema.org/addressRegion",
        "郵便番号": "http://schema.org/postalCode",
        "住所": "http://schema.org/streetAddress"
    }
}
Video: JSON-LD Compaction & Expansion
![]()
Click on the image above to watch a video JSON-LD expansion and compaction with reference to the @context and
interoperability.