
![]()
![]()
Description: This tutorial a wires up the dummy IoT devices which are responding using a custom XML message format. A custom IoT Agent is created based on the IoT Agent Node.js library and the framework found in the IoT Agent for JSON devices so that measurements can be read and commands can be sent using NGSI-v2 requests sent to the Orion Context Broker.
The tutorial uses cUrl commands throughout, but is also available as Postman documentation

![]()
Passing custom message formats
"And the whole earth was of one language, and of one speech."
— Genesis 11:1
As defined previously, an IoT Agent is a component that lets a group of devices sends their data to and be managed from a Context Broker using their own native protocols. Every IoT Agent is defined for a single payload format, although they may be able to use multiple disparate transports for that payload.
IoT Agents for many standard payloads exist, however it is possible to envisage that additional payloads may be needed as many potential sources of context data have already their own well-defined de-facto or de-jure standards for passing data around systems. As an example the ISOXML standard iso:11783 is frequently used with Agricultural Machinery.
The process for creating your own IoT Agent is relatively simple. It is best achieved through selecting an IoT Agent which uses the required data transport and rewriting/amending the payload processing code to handle the payloads in question.
For the purpose of this tutorial we will amend code from the existing JSON IoT Agent to process a similar custom XML format. A direct comparison of the two IoT Agents can be seen below:
| IoT Agent for JSON | IoT Agent for XML | Protocol's Area of Concern |
|---|---|---|
Sample Measure c\1 |
Sample Measure <measure device="lamp002" key="xxx"><c value="1"/></measure> |
Message Payload |
Sample Command Robot1@turn\left=30 |
Sample Command <turn device="Robot1"><left>30</left></turn> |
Message Payload |
Content Type is text/plain |
Content Type is application/xml |
Message Payload |
| Offers 3 transports - HTTP, MQTT and AMPQ | Offers 3 transports - HTTP, MQTT and AMPQ | Transport Mechanism |
HTTP listens for measures on iot/d by default |
HTTP listens for measures on iot/xml by default |
Transport Mechanism |
HTTP devices are identified by parameters ?i=XXX&k=YYY |
HTTP devices are identified by payload <measure device="XXX" key="YYY"> |
Device Identification |
| HTTP commands posted to a well-known URL - response is in the reply | HTTP commands posted to a well-known URL - response is in the reply | Communications Handshake |
MQTT devices are identified by the path of the topic /XXX/YYY |
MQTT devices are identified by the path of the topic /XXX/YYY |
Device Identification |
MQTT commands posted to the cmd topic |
MQTT commands posted to the cmd topic |
Communications Handshake |
MQTT command responses posted to the cmdexe topic |
MQTT commands posted to the cmdexe topic |
Communications Handshake |
As can be seen, the supported communications transports (HTTP, MQTT, AMPQ) remain the same, it is processing of the custom payload which will need to be adapted to ensure that the XML devices can communicate with the IoT Agent.
It should be noted that, depending on your use case, it also may be necessary to create an additional middleware for communications purposes. In this example the devices are capable of sending measures and listening and responding to the commands directly on two separate communications channels. A different paradigm is used within the LoRaWAN and OPC-UA IoT Agents where an HTTP middleware responds to the IoT Agent, and it is then responsible for converting the communications to the lower-level CoAP transport used by the devices.
The teaching goal of this tutorial
The aim of this tutorial is to improve developer understanding of how to create their own custom IoT Agents, a series of simple modifications has been made to the code of the JSON IoT Agent demonstrating how to make changes. The tutorial consists of a walkthrough of the relevant code and a series of HTTP requests to connect the new IoT Agent. The code can be found within the current GitHub Repository
Reusing Common Functionality
The benefit of modifying an existing IoT Agent is that the developer will be able to reuse the common functionality found across all IoT Agents. This includes functions such as:
- Offering a standard location to listen to device updates
- Offering a standard location to listen to context data updates
- Holding a list of devices and mapping context data attributes to device syntax
- Security Authorization
This base functionality has been abstracted out into a common IoT Agent framework library
Device Monitor
For the purpose of this tutorial, a series of dummy IoT devices have been created, which will be attached to the context
broker. Details of the architecture and protocol used can be found in the IoT Sensors tutorial The
state of each device can be seen on the XML device monitor web page found at: http://localhost:3000/device/monitor
Architecture
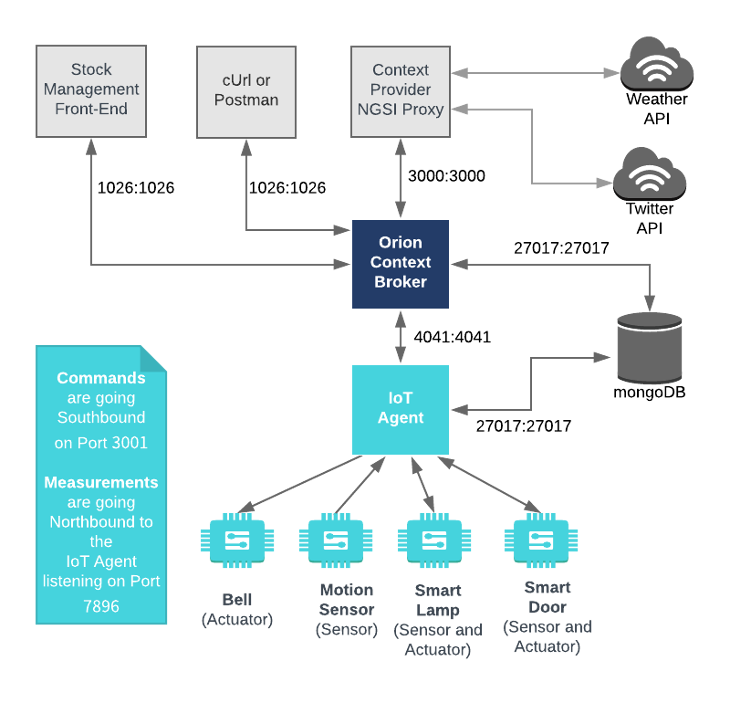
This application builds on the components created in previous tutorials. It will make use of one FIWARE component - the Orion Context Broker plus a Custom IoT Agent for XML. Usage of the Orion Context Broker is sufficient for an application to qualify as “Powered by FIWARE”. Both the Orion Context Broker and the IoT Agent and rely on open source MongoDB technology to keep persistence of the information they hold. We will also be using the dummy IoT devices created in the previous tutorial, however they have been already been adapted to respond to the custom XML messaging format.
Therefore, the overall architecture will consist of the following elements:
- The FIWARE Orion Context Broker which will receive requests using NGSI-v2
- The Custom IoT Agent for XML which will receive southbound requests using NGSI-v2 and convert them to XML commands for the devices
- The underlying MongoDB database :
- Used by the Orion Context Broker to hold context data information such as data entities, subscriptions and registrations
- Used by the IoT Agent to hold device information such as device URLs and Keys
- A webserver acting as set of dummy IoT devices using the custom XML messaging protocol running over HTTP.
Since all interactions between the elements are initiated by HTTP requests, the entities can be containerized and run from exposed ports.
The necessary configuration information for wiring up the IoT devices and the IoT Agent can be seen in the services
section of the associated docker-compose.yml file:
Dummy IoT Devices Configuration
tutorial:
    image: quay.io/fiware/tutorials.context-provider
    hostname: iot-sensors
    container_name: fiware-tutorial
    networks:
        - default
    expose:
        - '3000'
        - '3001'
    ports:
        - '3000:3000'
        - '3001:3001'
    environment:
        - 'DEBUG=tutorial:*'
        - 'PORT=3000'
        - 'IOTA_HTTP_HOST=iot-agent'
        - 'IOTA_HTTP_PORT=7896'
        - 'DUMMY_DEVICES_PORT=3001'
        - 'DUMMY_DEVICES_API_KEY=4jggokgpepnvsb2uv4s40d59ov'
        - 'DUMMY_DEVICES_TRANSPORT=HTTP'
        - 'DUMMY_DEVICES_PAYLOAD=XML'
The tutorial container is listening on two ports:
- Port
3000is exposed, so we can see the web page displaying the Dummy IoT devices. - Port
3001is exposed purely for tutorial access - so that cUrl or Postman can make XML commands without being part of the same network.
The tutorial container is driven by environment variables as shown:
| Key | Value | Description |
|---|---|---|
| DEBUG | tutorial:* |
Debug flag used for logging |
| WEB_APP_PORT | 3000 |
Port used by web-app which displays the dummy device data |
| IOTA_HTTP_HOST | iot-agent |
The hostname of the IoT Agent for XML - see below |
| IOTA_HTTP_PORT | 7896 |
The port that the IoT Agent for XML will be listening on. 7896 is a common default for communications over HTTP |
| DUMMY_DEVICES_PORT | 3001 |
Port used by the dummy IoT devices to receive commands |
| DUMMY_DEVICES_API_KEY | 4jggokgpepnvsb2uv4s40d59ov |
Random security key used for IoT interactions - used to ensure the integrity of interactions between the devices and the IoT Agent |
| DUMMY_DEVICES_TRANSPORT | HTTP |
The transport protocol used by the dummy IoT devices |
| DUMMY_DEVICES_PAYLOAD | XML |
The message payload protocol by the dummy IoT devices |
The other tutorial container configuration values described in the YAML file are not used in this tutorial.
Custom IoT Agent for XML Configuration
The code for the custom XML IoT Agent can be found within the
GitHub Repository associated to this
tutorial. It is a copy of the 1.12.0 version of the IoT Agent for JSON, lightly modified as described below. The
associated Dockerfile merely
copies the code into an appropriate location within a Docker container running Node.js. This allows the component to be
instantiated using a docker-compose.yaml file. The necessary configuration can be seen below:
iot-agent:
    image: quay.io/fiware/iotagent-xml
    build:
        context: iot-agent
        dockerfile: Dockerfile
    hostname: iot-agent
    container_name: fiware-iot-agent
    depends_on:
        - mongo-db
    networks:
        - default
    expose:
        - '4041'
        - '7896'
    ports:
        - '4041:4041'
        - '7896:7896'
    environment:
        - IOTA_CB_HOST=orion
        - IOTA_CB_PORT=1026
        - IOTA_NORTH_PORT=4041
        - IOTA_REGISTRY_TYPE=mongodb
        - IOTA_LOG_LEVEL=DEBUG
        - IOTA_TIMESTAMP=true
        - IOTA_CB_NGSI_VERSION=v2
        - IOTA_AUTOCAST=true
        - IOTA_MONGO_HOST=mongo-db
        - IOTA_MONGO_PORT=27017
        - IOTA_MONGO_DB=iotagentxml
        - IOTA_HTTP_PORT=7896
        - IOTA_PROVIDER_URL=http://iot-agent:4041
        - IOTA_DEFAULT_RESOURCE=/iot/xml
The iot-agent container relies on the presence of the Orion Context Broker and uses a MongoDB database to hold device
information such as device URLs and Keys. The container is listening on two ports:
- Port
7896is exposed to receive XML measurements over HTTP from the Dummy IoT devices - Port
4041is exposed purely for tutorial access - so that cUrl or Postman can make provisioning commands without being part of the same network.
The iot-agent container is driven by environment variables as shown:
| Key | Value | Description |
|---|---|---|
| IOTA_CB_HOST | orion |
Hostname of the context broker to update context |
| IOTA_CB_PORT | 1026 |
Port that context broker listens on to update context |
| IOTA_NORTH_PORT | 4041 |
Port used for Configuring the IoT Agent and receiving context updates from the context broker |
| IOTA_REGISTRY_TYPE | mongodb |
Whether to hold IoT device info in memory or in a database |
| IOTA_LOG_LEVEL | DEBUG |
The log level of the IoT Agent |
| IOTA_TIMESTAMP | true |
Whether to supply timestamp information with each measurement received from attached devices |
| IOTA_CB_NGSI_VERSION | v2 |
Whether to supply use NGSI v2 when sending updates for active attributes |
| IOTA_AUTOCAST | true |
Ensure XML number values are read as numbers not strings |
| IOTA_MONGO_HOST | context-db |
The hostname of mongoDB - used for holding device information |
| IOTA_MONGO_PORT | 27017 |
The port mongoDB is listening on |
| IOTA_MONGO_DB | iotagentxml |
The name of the database used in mongoDB |
| IOTA_HTTP_PORT | 7896 |
The port where the IoT Agent listens for IoT device traffic over HTTP |
| IOTA_PROVIDER_URL | http://iot-agent:4041 |
URL passed to the Context Broker when commands are registered, used as a forwarding URL location when the Context Broker issues a command to a device |
| IOTA_DEFAULT_RESOURCE | /iot/xml |
The default path the IoT Agent uses listening for custom XML measures. |
Video: NGSI-v2 IoT Agent
![]()
Click on the image above to watch a demo of this tutorial describing how to create an XML IoT Agent.
Start Up
Before you start you should ensure that you have obtained or built the necessary Docker images locally. Please clone the repository and create the necessary images by running the commands as shown:
#!/bin/bash
git clone https://github.com/FIWARE/tutorials.Custom-IoT-Agent.git
cd tutorials.Custom-IoT-Agent
git checkout NGSI-v2

./services create
Thereafter, all services can be initialized from the command-line by running the services Bash script provided within the repository:
./services start
Note: If you want to clean up and start over again you can do so with the following command:
./services stop
Creating a Custom IoT Agent
The following section consists of a series of HTTP commands used to provision the IoT Agent and receive measures and send commands. The relevant amended code within the Custom IoT Agent is discussed as each action is processed.
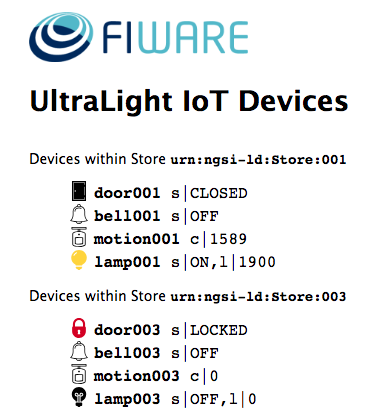
To follow the tutorial correctly please ensure you have the device monitor page available in your browser and click on the page to enable audio before you enter any cUrl commands. The device monitor displays the current state of an array of dummy devices using XML syntax
Device Monitor
The device monitor can be found at: http://localhost:3000/device/monitor
Note: In addition to user interactions, All dummy devices will periodically register a heartbeat message
Checking the IoT Agent Service Health
You can check if the IoT Agent is running by making an HTTP request to the exposed port:
1 Request:
curl -X GET \
  'http://localhost:4041/iot/about'
The response will look similar to the following:
{
    "libVersion": "2.6.0-next",
    "port": "4041",
    "baseRoot": "/",
    "version": "1.12.0-next"
}
This is standard functionality coming directly from the IoT Agent Node.js library and does not involve any code changes.
Provisioning a Service Group
Invoking group provision is always the first step in connecting devices since it is always necessary to supply an authentication key with each measurement and the IoT Agent will not initially know which URL the context broker is responding on.
It is also possible to set up default commands and attributes for all anonymous devices as well, but this is not done within this tutorial as we will be provisioning each device separately.
This example provisions an anonymous group of devices. It tells the IoT Agent that a series of devices will be sending
messages to the IOTA_HTTP_PORT (where the IoT Agent is listening for Northbound communications)
2 Request:
curl -iX POST \
  'http://localhost:4041/iot/services' \
  -H 'Content-Type: application/json' \
  -H 'fiware-service: openiot' \
  -H 'fiware-servicepath: /' \
  -d '{
 "services": [
   {
     "apikey":      "4jggokgpepnvsb2uv4s40d59ov",
     "cbroker":     "http://orion:1026",
     "entity_type": "Thing",
     "resource":    "/iot/xml"
   }
 ]
}'
In the example the IoT Agent is informed that the /iot/xml endpoint will be used and that devices will authenticate
themselves by including the token 4jggokgpepnvsb2uv4s40d59ov. For the custom XML IoT Agent this means devices will be
sending POST requests to:
http://iot-agent:7896/iot/xml
Where the <measure> holds the relevant device ID and API key.
<measure device="motion001" key="4jggokgpepnvsb2uv4s40d59ov">
    <c value="3"/>
</measure>
This syntax differs from the JSON IoT Agent where the device ID and API key are sent as URL parameters.
Reading XML - Analysing the Code
The relevant changes can be found in the HTTPBindings.js file where an XML parser is instantiated.
const xmlBodyParser = require('express-xml-bodyparser');
httpBindingServer.router.post(
    config.getConfig().iota.defaultResource || constants.HTTP_MEASURE_PATH,
    ...xmlBodyParser({ trim: false, explicitArray: false }),
    checkMandatoryParams(false),
    ...etc
);
This means that attributes from the XML request can be accessed using the square-bracket syntax. Since both apiKey and
deviceId are required parameters, they can be found within the received <measure>.
function checkMandatoryParams(queryPayload) {
    return function (req, res, next) {
        var notFoundParams = [],
            error;

        req.apiKey = req.body['measure']['$']['key'];
        req.deviceId = req.body['measure']['$']['device'];

        if (!req.apiKey) {
            notFoundParams.push('API Key');
        }

        if (!req.deviceId) {
            notFoundParams.push('Device Id');
        }

        // CHeck if retrievingParam
        if (queryPayload && !req.query.d && req.query.getCmd !== '1') {
            notFoundParams.push('Payload');
        }

        if (req.method === 'POST' && !req.is('application/xml')) {
            error = new errors.UnsupportedType('application/xml');
        }

        if (notFoundParams.length !== 0) {
            next(new errors.MandatoryParamsNotFound(notFoundParams));
        } else {
            next(error);
        }
    };
}
This function also checks that the appropriate MIME type has been received and fails fast if the incoming message does not hold sufficient information.
Provisioning a Sensor
It is common good practice to use URNs following the NGSI-LD specification when creating entities. Furthermore, it is easier to understand meaningful names when defining data attributes. These mappings can be defined by provisioning a device individually.
Three types of measurement attributes can be provisioned:
attributesare active readings from the devicelazyattributes are only sent on request - The IoT Agent will inform the device to return the measurementstatic_attributesare as the name suggests static data about the device (such as relationships) passed on to the context broker.
Note: in the case where individual
ids are not required, or aggregated data is sufficient theattributescan be defined within the provisioning service rather than individually.
3 Request:
curl -iX POST \
  'http://localhost:4041/iot/devices' \
  -H 'Content-Type: application/json' \
  -H 'fiware-service: openiot' \
  -H 'fiware-servicepath: /' \
  -d '{
 "devices": [
   {
     "device_id":   "motion001",
     "entity_name": "urn:ngsi-ld:Motion:001",
     "entity_type": "Motion",
     "timezone":    "Europe/Berlin",
     "attributes": [
       { "object_id": "c", "name": "count", "type": "Integer" }
     ],
     "static_attributes": [
       { "name":"refStore", "type": "Relationship", "value": "urn:ngsi-ld:Store:001"}
     ]
   }
 ]
}
'
As expected the HTTP command to provision a device does not change based on the underlying payload or transport
protocol since we are using the same HTTP transport as the original JSON IoT Agent. internal_atttributes can be used
to supply additional information for the custom IoT Agent if necessary. In the request we are associating the device
motion001 with the URN urn:ngsi-ld:Motion:001 and mapping the device reading c with the context attribute count
(which is defined as an Integer) A refStore is defined as a static_attribute, placing the device within Store
urn:ngsi-ld:Store:001
You can simulate a dummy IoT device measurement coming from the Motion Sensor device motion001, by making the
following XML request
4 Request:
curl -L -X POST 'http://localhost:7896/iot/xml' \
-H 'Content-Type: application/xml' \
--data-raw '<measure device="motion001" key="4jggokgpepnvsb2uv4s40d59ov">
    <c value="3"/>
</measure>'
Reading Measures - Analysing the Code
Both the payload and the Content-Type have been updated. The dummy devices made a similar JSON request in the previous
tutorials when the door was unlocked, you will have seen the state of each motion sensor changing and a Northbound
request will be logged in the device monitor.
Now the IoT Agent is connected, the service group has defined the resource upon which the IoT Agent is listening
(iot/xml) and the API key used to authenticate the request (4jggokgpepnvsb2uv4s40d59ov) is found in the body. Since
both of these are recognized, the measurement is valid.
The next step is to parse the payload extract the attributes. This can be found in the amended parse method of the
xmlparser.js file
function parse(payload) {
    let result = [];
    const keys = Object.keys(payload['measure']);
    for (let i = 0; i < keys.length; i++) {
        if (keys[i] !== '$') {
            let obj = {};
            obj[keys[i]] = payload['measure'][keys[i]]['$'].value;
            result.push(obj);
        }
    }
    return result;
}
parse() returns a JSON array of key-value pairs which can then be mapped from device attribute names (like c) to
entity attribute names (like count) - obviously the mapping is based on the values sent in the original provisioning.
You can see that a measurement has been recorded, by retrieving the entity data from the context broker. Don't forget to
add the fiware-service and fiware-service-path headers.
5 Request:
curl -X GET \
  'http://localhost:1026/v2/entities/urn:ngsi-ld:Motion:001?type=Motion' \
  -H 'fiware-service: openiot' \
  -H 'fiware-servicepath: /'
Response:
Tip: Use jq to format the JSON responses in this tutorial. Pipe the result by appending
| jq '.'
{
    "id": "urn:ngsi-ld:Motion:001",
    "type": "Motion",
    "TimeInstant": {
        "type": "ISO8601",
        "value": "2018-05-25T10:51:32.00Z",
        "metadata": {}
    },
    "count": {
        "type": "Integer",
        "value": "3",
        "metadata": {
            "TimeInstant": {
                "type": "ISO8601",
                "value": "2018-05-25T10:51:32.646Z"
            }
        }
    },
    "refStore": {
        "type": "Relationship",
        "value": "urn:ngsi-ld:Store:001",
        "metadata": {
            "TimeInstant": {
                "type": "ISO8601",
                "value": "2018-05-25T10:51:32.646Z"
            }
        }
    }
}
The response shows that the Motion Sensor device with id=motion001 has been successfully identified by the IoT
Agent and mapped to the entity id=urn:ngsi-ld:Motion:001. This new entity has been created within the context data.
The c attribute from the dummy device measurement request has been mapped to the more meaningful count attribute
within the context data.
Provisioning an Actuator
Provisioning an actuator is similar to provisioning a sensor. This time an endpoint attribute holds the location where
the IoT Agent needs to send the XML command and the commands array includes a list of each command that can be
invoked. The example below provisions a bell with the deviceId=bell001. The endpoint is
http://iot-sensors:3001/iot/bell001 and it can accept the ring command. The transport=HTTP attribute defines the
communications protocol to be used.
6 Request:
curl -iX POST \
  'http://localhost:4041/iot/devices' \
  -H 'Content-Type: application/json' \
  -H 'fiware-service: openiot' \
  -H 'fiware-servicepath: /' \
  -d '{
  "devices": [
    {
      "device_id": "bell001",
      "entity_name": "urn:ngsi-ld:Bell:001",
      "entity_type": "Bell",
      "transport": "HTTP",
      "endpoint": "http://iot-sensors:3001/iot/bell001",
      "commands": [
        { "name": "ring", "type": "command" }
       ],
       "static_attributes": [
         {"name":"refStore", "type": "Relationship","value": "urn:ngsi-ld:Store:001"}
      ]
    }
  ]
}
'
As is the case with provisioning a measure, this request remains unchanged. Implicitly within the structure of the IoT Agent the provisioning of commands fulfills the following implied contract:
- The custom IoT Agent is making a registration for an attribute
- The custom IoT Agent each request for updating context (on the
/v2/op/updateendpoint) - A decision is made how to handle the request - for both the Custom IoT Agent and the JSON Agent this follows the
paradigm of setting a
<command>Stateattribute, amending and forwarding the request on a/cmdendpoint to the device (or alternatively to a middleware responsible for the device).
The first two items - listening to context changes from the context broker follow the well-defined NGSI syntax and therefore are common to all IoT Agents. However, the third item - what to do to prepare the message for ongoing consumption will vary according to the protocol which is being abstracted out.
Before we wire-up the context broker, we can test that a command can be sent to a device by making a REST request
directly to the IoT Agent's North Port using the /v2/op/update endpoint. It is this endpoint that will eventually be
invoked by the context broker once we have connected it up. To test the configuration you can run the command directly
as shown:
7 Request:
curl -iX POST \
  http://localhost:4041/v2/op/update \
  -H 'Content-Type: application/json' \
  -H 'fiware-service: openiot' \
  -H 'fiware-servicepath: /' \
  -d '{
    "actionType": "update",
    "entities": [
        {
            "type": "Bell",
            "id": "urn:ngsi-ld:Bell:001",
            "ring" : {
                "type": "command",
                "value": ""
            }
        }
    ]
}'
If you are viewing the device monitor page, you can also see the state of the bell change.
The result of the command to ring the bell can be read by querying the entity within the Orion Context Broker.
Reading Commands - Analysing the Code
Within the custom IoT Agent the start() function sets a series of handler functions to fire when a request arrives
from the context broker.
iotAgentLib.setProvisioningHandler(deviceProvisioningHandler);
iotAgentLib.setConfigurationHandler(configurationHandler);
iotAgentLib.setCommandHandler(commandHandler);
iotAgentLib.setDataUpdateHandler(updateHandler);
This is passed to the appropriate transport binding and in this case, the commandHandler() method within
HTTPBindings.js is fired. It provides an HTTP error handler, but delegates the actual work of creating and sending the
command to the device to generateCommandExecution().
function generateCommandExecution(apiKey, device, attribute) {
    //...
    const options = {
        url: device.endpoint,
        method: 'POST',
        body: xmlParser.createCommandPayload(device, cmdName, cmdAttributes),
        headers: {
            'fiware-service': device.service,
            'fiware-servicepath': device.subservice
        }
    };
    //...
}
The payload itself, in other words how a command must be created such that it can be interpreted by the device, is
unique to our custom XML messaging protocol and is generated in createCommandPayload() method in xmlParser.js.
function createCommandPayload(device, command, attributes) {
    if (typeof attributes === 'object') {
        let payload = '<' + command + '  device="' + device.id + '">';

        Object.keys(attributes).forEach(function (key, value) {
            payload = payload + '<' + key + '>' + value + '</' + key + '>';
        });
        payload = payload + '</' + command + '>';
        return payload;
    } else {
        return '<' + command + '  device="' + device.id + '"/>';
    }
}
This is an amendment from the JSON protocol where the @ and | symbol is generated for JSON devices.
However, creating a payload is only half the job, it must be sent to the device and understood, so communications must
be completed using a well-defined communications handshake. So after generating the payload the sendXMLCommandHTTP()
method of HTTPBindings.js sends the message and passes the response to the result() method in xmlParser.js to
interprets the command response from the device.
function result(payload) {
    const xmlToJson = require('xml-parser');
    const data = xmlToJson(payload);
    const result = {};
    result.deviceId = data.root.attributes.device;
    result.command = data.root.attributes.command;
    result.result = data.root.name;

    return result;
}
Finally, the success or failure of the command is updated into the context broker using common code from the IoT Agent node library.
As is typical for IoT Agents, creation of payloads and the handshake of communications has been split into two separate concerns for ease of maintenance. Therefore, since in our case only the payload has changed, it is only the XML payload side of the code that needs modification to fulfil our custom use case.
The result of the actuator command can be read in the context broker using standard NGSI commands.
8 Request:
curl -X GET \
  'http://localhost:1026/v2/entities/urn:ngsi-ld:Bell:001?type=Bell&options=keyValues' \
  -H 'fiware-service: openiot' \
  -H 'fiware-servicepath: /'
Response:
{
    "id": "urn:ngsi-ld:Bell:001",
    "type": "Bell",
    "TimeInstant": "2018-05-25T20:06:28.00Z",
    "refStore": "urn:ngsi-ld:Store:001",
    "ring_info": "success",
    "ring_status": "OK",
    "ring": ""
}
The result of ring command can be seen in the value of the ring_info attribute.
Once a custom IoT Agent has been developed, users will be able to actuate the devices purely by sending standard NGSI requests to the context broker, the low-level underlying protocol however remains unknown to them and has been successfully abstracted into the IoT Agent.