
![]()
Description: This tutorial complements the previous Securing Access tutorial. This tutorial also secures access to a FIWARE application but using various OpenID Connect flows to authenticate users.
![]()
Authenticating Identities (OpenID)
"Yes, your home is your castle, but it is also your identity and your possibility to be open to others.
— David Soul
Digital identities represent both the characteristics of people and the actions they carry out on the Internet. In order to secure an application it is necessary to authenticate that the identity is really who it says it is. In addition to OAuth 2.0, the FIWARE Keyrock generic enabler supports OpenID Connect (OIDC) to enable third-party applications to authenticate users. OpenID Connect is a simple identity layer on top of the OAuth 2.0 protocol. It enables to verify the identity of users and to obtain a basic profile about these users by using Json Web Tokens.
The OpenID Connect flows are build on the top of these three OAuth 2.0 grant flows:
Authorization and authentication are two completely different things. The first one allows or not to access certain data while the second one is about sign in. OAuth 2.0 enables authorization processes, but it lacks ways to identify and authenticate users. OIDC was created to solve OAuth 2.0 authentication issue. Either OAuth 2.0 and OIDC generate a token that identifies the user avoiding exposing the username and password. Particularly, OIDC generates a Json Web Token (JWT) that applications can intrinsically validate and obtain user information directly from itself.
Video: What is OpenID Connect?
![]()
Click on the image above to watch a video on OpenID connect and identity.
OAuth2 is a mechanism for granting access - specifically Authorization - Can I do this?). Technically, within the OAuth protocol there is no concept of Identity per se, and therefore it is not really designed for Authentication (I am User X) even if it is able to fulfil certain Authentication use cases such mobile app log in. OpenID provides an extension to OAuth2 enabling applications to obtain user information in a standard manner.
OpenID connect works across multiple entity providers (such as Keyrock) and is operated using JSON Web tokens. It
adds an additional ID token to the response which holds some basic user information, additional user information can be
requested from the standardized /userinfo endpoint.
OpenID connect requests follow a very similar flow to OAuth2 requests. They are distinguished by using the openid
scope when making the initial request. The response contains an encoded JWT token holding elements described below:
| name | description |
|---|---|
iss |
Issuer Identifier for the Issuer of the response. |
sub |
Subject Identifier. |
aud |
Audience(s) that this ID Token is intended for. |
exp |
Expiration time. |
iat |
Time at which the JWT was issued. |
Other entries may also be added. The full OpenID specification can be found here.
Standard Concepts of Json Web Tokens
A JSON Web Token (JWT) has the following structure:
- Header. It identifies the algorithm used to sign the Json Web Token.
{
    "alg": "HS256",
    "typ": "JWT"
}
- Payload. It contains user data, as well as information on when the token was created and who created it.
{
    "sub": "1234567890",
    "iss": "https://fiware-idm.com",
    "iat": 1516239022,
    "username": "Alice",
    "gravatar": true
}
- Signature. It is generated as follows:
Crypto-Algorithm ( base64urlEncoding(header) + '.' + base64urlEncoding(payload), secret)
The JWT is the result of encoding each part using base64 and concatenating them with points. For instance:
eyJhbGciOiJIUzI1NiIsInR5cCI6IkpXVCJ9.eyJzdWIiOiIxMjM0NTY3ODkwIiwiaXNzIjoiaHR0cHM6Ly9maXdhcmUtaWRtLmNvbSIsImlhdCI6MTUxNjIzOTAyMiwidXNlcm5hbWUiOiJBbGljZSIsImdyYXZhdGFyIjp0cnVlfQ.dZ7z0u_4FZC7xiVQDtGAl7NRT0fK8_5hJqYa9E-4xGE
Architecture
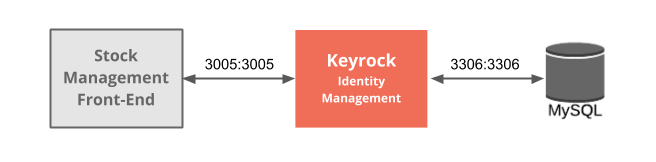
This application adds OIDC-driven security into the existing Stock Management and Sensors-based application created in previous tutorials by using the data created in the first security tutorial and reading it programmatically. It will make use of one FIWARE component - the Keyrock Generic enabler. Keyrock uses its own MySQL database. This tutorial only focus on granting JWT by the use of OIDC. You can practice using the tokens to securely access sensor information in the tutorial Securing Access tutorial.
Therefore, the overall architecture will consist of the following elements:
- FIWARE Keyrock offer a complement Identity Management System
including:
- An OAuth2 authorization system for Applications and Users.
- An OIDC authentication system for Applications and Users.
- A site graphical frontend for Identity Management Administration.
- An equivalent REST API for Identity Management via HTTP requests.
- A MySQL database :
- Used to persist user identities, applications, roles and permissions.
- The Stock Management Frontend does the following:
- Displays store information.
- Shows which products can be bought at each store.
- Allows users to "buy" products and reduce the stock count.
- Allows authorized users into restricted areas.
Since all interactions between the elements are initiated by HTTP requests, the entities can be containerized and run from exposed ports.
The necessary configuration information for adding security to the Stock Management Frontend can be found in the
tutorial section of the associated docker-compose.yml file - only the relevant variables are shown below:
Tutorial Security Configuration
tutorial:
    image: quay.io/fiware/tutorials.context-provider
    hostname: iot-sensors
    container_name: fiware-tutorial
    networks:
        default:
            ipv4_address: 172.18.1.7
    expose:
        - '3000'
        - '3001'
    ports:
        - '3000:3000'
        - '3001:3001'
    environment:
        - 'DEBUG=tutorial:*'
        - 'SECURE_ENDPOINTS=true'
        - 'OIDC_ENABLED=true'
        - 'WEB_APP_PORT=3000'
        - 'KEYROCK_URL=http://localhost'
        - 'KEYROCK_IP_ADDRESS=http://172.18.1.5'
        - 'KEYROCK_PORT=3005'
        - 'KEYROCK_CLIENT_ID=tutorial-dckr-site-0000-xpresswebapp'
        - 'KEYROCK_CLIENT_SECRET=tutorial-dckr-site-0000-clientsecret'
        - 'KEYROCK_JWT_SECRET=jsonwebtokenpass'
        - 'CALLBACK_URL=http://localhost:3000/login'
The tutorial container is listening on two ports:
- Port
3000is exposed, so we can see the web page displaying the Dummy IoT devices. - Port
3001is exposed purely for tutorial access - so that cUrl or Postman can make JSON commands without being part of the same network.
The tutorial container is driven by environment variables as shown:
| Key | Value | Description |
|---|---|---|
| DEBUG | tutorial:* |
Debug flag used for logging |
| OIDC_ENABLED | true |
Enable OpenID Connect in the tutorial |
| KEYROCK_CLIENT_ID | tutorial-dckr-site-0000-xpresswebapp |
The Client ID defined by Keyrock for this application |
| KEYROCK_CLIENT_SECRET | tutorial-dckr-site-0000-clientsecret |
The Client Secret defined by Keyrock for this application |
| KEYROCK_JWT_SECRET | jsonwebtokenpass |
The JWT Secret defined by Keyrock for this application to validate id_tokens |
| CALLBACK_URL | http://localhost:3000/login |
The callback URL used by Keyrock when a challenge has succeeded. |
The other tutorial container configuration values described in the YAML file have been described in previous
tutorials.
Start Up
To start the installation, do the following:
#!/bin/bash
git clone https://github.com/FIWARE/tutorials.Securing-Access-OpenID-Connect.git
cd tutorials.Securing-Access-OpenID-Connect
git checkout NGSI-v2

./services create
Note The initial creation of Docker images can take up to three minutes
Thereafter, all services can be initialized from the command-line by running the services Bash script provided within the repository:
./services start
Note: If you want to clean up and start over again you can do so with the following command:
./services stop
Dramatis Personae
The following people at test.com legitimately have accounts within the Application:
- Alice, she will be the Administrator of the Keyrock Application.
- Bob, the Regional Manager of the supermarket chain - he has several store managers under him:
- Manager1
- Manager2
- Charlie, the Head of Security of the supermarket chain - he has several store detectives under him:
- Detective1
- Detective2
The following people at example.com have signed up for accounts, but have no reason to be granted access:
- Eve - Eve the Eavesdropper.
- Mallory - Mallory the malicious attacker.
- Rob - Rob the Robber.
For more details (Click to expand)
| Name | eMail | Password | | ---------- | --------------------------- | -------- | | alice | `alice-the-admin@test.com` | `test` | | bob | `bob-the-manager@test.com` | `test` | | charlie | `charlie-security@test.com` | `test` | | manager1 | `manager1@test.com` | `test` | | manager2 | `manager2@test.com` | `test` | | detective1 | `detective1@test.com` | `test` | | detective2 | `detective2@test.com` | `test` | | Name | eMail | Password | | ------- | --------------------- | -------- | | eve | `eve@example.com` | `test` | | mallory | `mallory@example.com` | `test` | | rob | `rob@example.com` | `test` |Two organizations have also been set up by Alice:
| Name | Description | UUID |
|---|---|---|
| Security | Security Group for Store Detectives | security-team-0000-0000-000000000000 |
| Management | Management Group for Store Managers | managers-team-0000-0000-000000000000 |
One application, with appropriate roles and permissions has also been created:
| Key | Value |
|---|---|
| Client ID | tutorial-dckr-site-0000-xpresswebapp |
| Client Secret | tutorial-dckr-site-0000-clientsecret |
| JWT Secret | jsonwebtokenpass |
| URL | http://localhost:3000 |
| RedirectURL | http://localhost:3000/login |
To save time, the data creating users and organizations from the previous tutorial has been downloaded and is automatically persisted to the MySQL database on start-up so the assigned UUIDs do not change and the data does not need to be entered again.
The Keyrock MySQL database deals with all aspects of application security including storing users, password etc.; defining access rights and dealing with OAuth2 authorization protocols. The complete database relationship diagram can be found here.
To refresh your memory about how to create users and organizations and applications, you can log in at
http://localhost:3005/idm using the account alice-the-admin@test.com with a password of test.
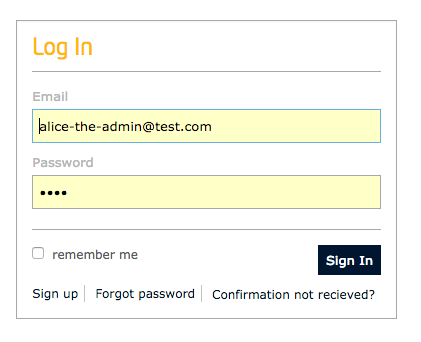
and look around.
OIDC Flows
FIWARE Keyrock complies with the OIDC standard described in OpenID Connect 1.0 and supports all three standard authentication flows defined there.
As OIDC is built on the top of OAuth 2.0, when making requests to the OAuth Token Endpoint, the Authorization header
is built by combining the application Client ID and Client Secret credentials provided by the Keyrock separated by a
: and base-64encoded. The value can be generated as shown:
echo tutorial-dckr-site-0000-xpresswebapp:tutorial-dckr-site-0000-clientsecret | base64
dHV0b3JpYWwtZGNrci1zaXRlLTAwMDAteHByZXNzd2ViYXBwOnR1dG9yaWFsLWRja3Itc2l0ZS0wMDAwLWNsaWVudHNlY3JldAo=
Enable OpenID Connect
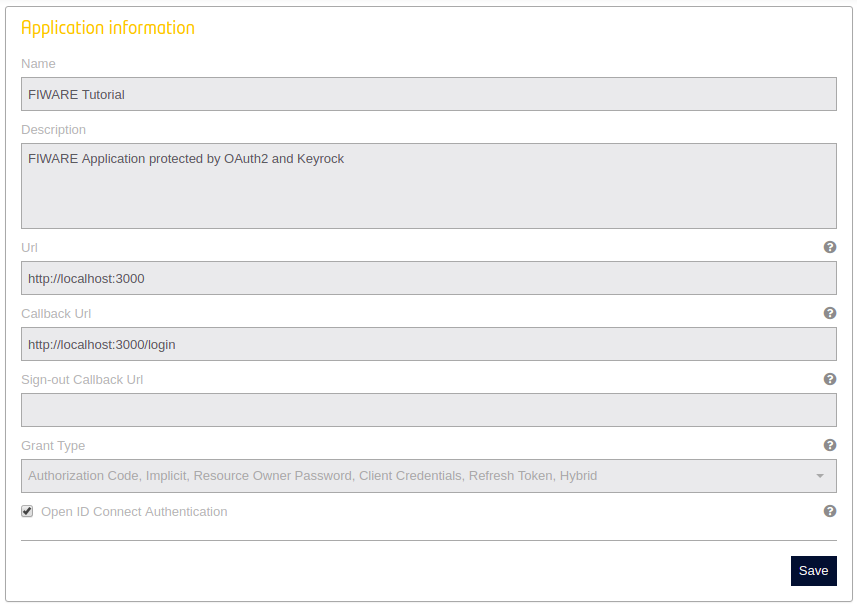
OpenID Connect can be enabled on a Keyrock's application either through the GUI or through the REST API.
GUI
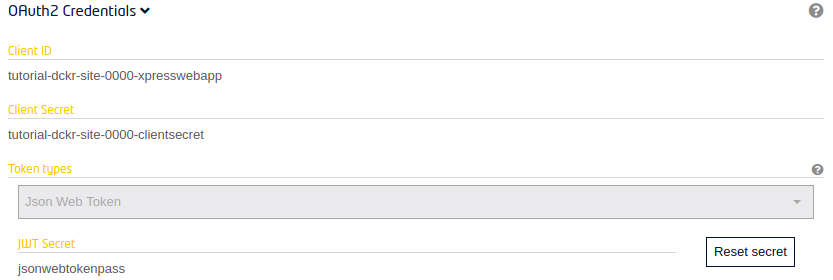
Once signed-in, users are able to activate OIDC in their application through the edit web page.
The secret to be used when validating JSON Web Tokens can be found in the application information web page.
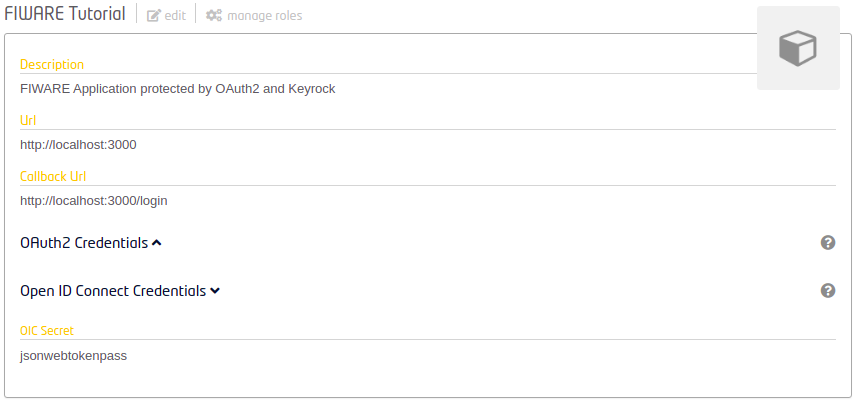
The JWT secret could be also refreshed by clicking on the "Reset secret" button in the OAuth2 credentials section.
REST API
Enabling OIDC can be also done when creating an application in Keyrock. It can be made via a POST request to the
/v1/applications as described in
Roles and Permissions tutorial, including the openid into the
scope attribute.
curl -iX POST \
  'http://localhost:3005/v1/applications' \
  -H 'Content-Type: application/json' \
  -H 'X-Auth-token: aaaaaaaa-aaaa-aaaa-aaaa-aaaaaaaaaaaa' \
  -d '{
  "application": {
    "name": "Tutorial Application",
    "description": "FIWARE Application protected by OAuth2 and Keyrock",
    "redirect_uri": "http://tutorial/login",
    "url": "http://tutorial",
    "grant_type": [
      "authorization_code",
      "implicit",
      "password"
    ],
    "scope": "openid",
    "token_types": ["permanent"]
  }
}'
If the applications has been already created, this can also be done from the command-line by making a PATCH request.
curl -X PATCH \
  'http://localhost:3005/v1/applications/{{application-id}}' \
  -H 'Content-Type: application/json' \
  -H 'X-Auth-token: aaaaaaaa-aaaa-aaaa-aaaa-aaaaaaaaaaaa' \
  -d '{
  "application": {
    "scope": "openid"
  }
}'
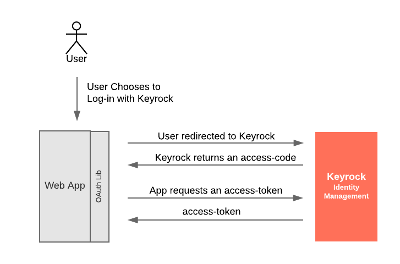
Authorization Code Flow
The Authorization Code flow can be adapted to support authentication mechanisms. OIDC does not modify the flow of the authorization code itself but simply adds a parameter to the request to the Authorization endpoint as we will see below. The response returns an access-code which can be exchanged for an id_token which then identifies the user.
This is an example of the sort of flow used when a third party (such as Travis-CI) asks you to log in using your GitHub account. Travis never gains access to your password, but does receive details that you are who you claim to be from GitHub.
Authorization Code - Sample Code
A user must first be redirected to Keyrock, requesting a code, oa.getAuthorizeUrl() is returning a URL of the
form /oauth/authorize?response_type=code&client_id={{client-id}}&state=oic&redirect_uri={{callback_url}}&scope=openid
The value "openid" is included in the scope parameter of the request to indicate to Keyrock that this is an OIDC request. The state value in this tutorial could be "oauth2" and "oic". This value indicates how to manage the answers coming from Keyrock:
function authCodeOICGrant(req, res) {
    const path = oa.getAuthorizeUrl('code', 'openid', 'oic');
    return res.redirect(path);
}
The after the User authorizes access, the response is received by the redirect_uri and is handled in the code below, a
interim access code is received from Keyrock and second request must be made to obtain a usable id_token.
function authCodeOICGrantCallback(req, res) {
    return oa
        .getOAuthAccessToken(req.query.code, 'authorization_code')
        .then((results) => {
            return getUserFromIdToken(req, results.id_token);
        })
        .then((user) => {
            // Store user
        });
}
The id_token is just a JWT that we can validate using the JWT Secret that we have preconfigured in the application through the environment variables and obtain the user information from that id_token.
function getUserFromIdToken(req, idToken) {
    return new Promise(function (resolve, reject) {
        jwt.verify(idToken, jwtSecret, function (error, decoded) {
            // Decoded --> Json with user, token and issuer information
        });
    });
}
The decoded json is returned as shown:
{
    "alg": "HS256",
    "typ": "JWT"
}
{
    "organizations": [],
    "displayName": "",
    "roles": [],
    "app_id": "tutorial-dckr-site-0000-xpresswebapp",
    "trusted_apps": [],
    "isGravatarEnabled": false,
    "email": "alice-the-admin@test.com",
    "id": "aaaaaaaa-good-0000-0000-000000000000",
    "app_azf_domain": "",
    "username": "alice",
    "trusted_applications": [],
    "iss": "https://fiware-idm.com",
    "sub": "aaaaaaaa-good-0000-0000-000000000000",
    "aud": "tutorial-dckr-site-0000-xpresswebapp",
    "exp": 1516238462,
    "iat": 1516239022
}
To decode the JWT yourself, you can paste the token into the JWT site - The signature used to sign
the token is 59de900a973fa2e0 and can be pasted into the site to verify that the encoded identity came from Keyrock:
HMACSHA256(
  base64UrlEncode(header) + "." +
  base64UrlEncode(payload),
  59de900a973fa2e0
)
Authorization Code - Running the Example
It is possible to invoke the Authorization Code grant flow programmatically, by bringing up the page
http://localhost:3000/ and clicking on the Authorization Code Button.
The user is initially redirected to Keyrock, and must log in:
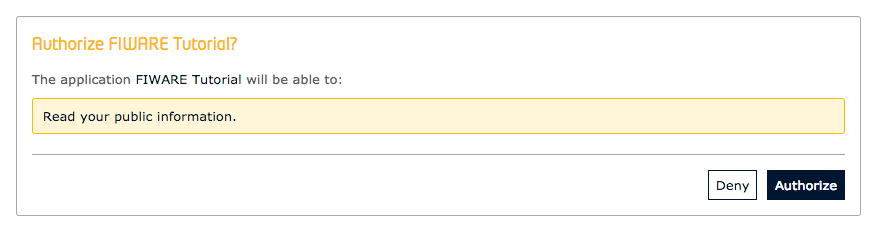
The user must then authorize the request:
The response displays the user on the top right of the screen, details of the token are flashed onto the screen:

Note Unless you deliberately log out of Keyrock >
http://localhost:3005, the existing Keyrock session which has already permitted access will be used for subsequent authorization requests, so the Keyrock login screen will not be shown again.
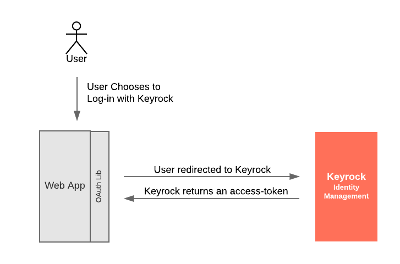
Implicit Flow
The Implicit flow can also be adapted to
support authentication mechanisms. As well as in the authorization code grant, OIDC does not modify the flow but changes
the response_type of the requests. This flow returns an id_token directly rather than returning an interim
access-code. This is less secure than the Authcode flow but can be used in some client-side applications:
Implicit Flow - Sample Code
A user must first be redirected to Keyrock, requesting a token, oa.getAuthorizeUrl() is returning a URL of the
form /oauth/authorize?response_type=id_token&client_id={{client-id}}&state=oic&redirect_uri={{callback_url}} Note that
to follow an OIDC flow the response type is "id_token".
function implicitOICGrant(req, res) {
    const path = oa.getAuthorizeUrl('id_token', null, 'oic');
    return res.redirect(path);
}
The after the User authorizes access, the response is received by the redirect_uri and is handled in the code below, a
usable access token is received from Keyrock:
function implicitOICGrantCallback(req, res) {
    return getUserFromIdToken(req, req.query.id_token).then((user) => {
        // Store User and return
    });
}
The id_token is just a JWT that we can validate using the JWT Secret as it was explained in the authorization code section.
Implicit Flow - Running the Example
It is possible to invoke the Implicit grant flow programmatically, by bringing up the page http://localhost:3000/ and
clicking on the Implicit Grant Button.
The user is initially redirected to Keyrock, and must log in:
The user must then authorize the request:
The response displays the user on the top right of the screen, details of the token are also flashed onto the screen:

Note Unless you deliberately log out of Keyrock >
http://localhost:3005, the existing Keyrock session which has already permitted access will be used for subsequent authorization request.
Hybrid Flow
The Hybrid flow combines the authorization code and the implicit grant. It could be useful to parallelize process in the frontend and the backend of applications. The flow is similar to the authorization code grant but in this case tokens are generated in both authorization and token endpoint.
Hybrid - Sample Code
A user must first be redirected to Keyrock, requesting a code, oa.getAuthorizeUrl() is returning a URL of the
form
/oauth/authorize?response_type=code id_token token&client_id={{client-id}}&state=oic&redirect_uri={{callback_url}}&scope=openid
Note that in a hybrid flow is required to include all the response_types: code, token and id_token. In the first request
this will generate an authorization code, an access token and an id_token. If we also include the scope "openid", when
using authorization code previously generated, Keyrock generates a new access token and a new id_token.
function hybridOICGrant(req, res) {
    const path = oa.getAuthorizeUrl('code id_token token', 'openid', 'oic');
    return res.redirect(path);
}
The after the User authorizes access, the response is received by the redirect_uri and is handled in the code below, a
interim access code is received from Keyrock and second request must be made to obtain a usable id_token.
function authCodeOICGrantCallback(req, res) {
    return oa
        .getOAuthAccessToken(req.query.code, 'hybrid')
        .then((results) => {
            return getUserFromIdToken(req, results.id_token);
        })
        .then((user) => {
            // Store User and return
        });
}
The id_token is just a JWT that we can validate using the JWT Secret as it was explained in the authorization code section.
Hybrid - Running the Example
It is possible to invoke the Hybrid flow programmatically, by bringing up the page http://localhost:3000/ and clicking
on the Hybrid Button.
The user is initially redirected to Keyrock, and must log in:
The user must then authorize the request:
The response displays the user on the top right of the screen, details of the token are flashed onto the screen:

Note Unless you deliberately log out of Keyrock >
http://localhost:3005, the existing Keyrock session which has already permitted access will be used for subsequent authorization requests, so the Keyrock login screen will not be shown again.