
Description: This tutorial uses a PEP Proxy combined with the Keyrock to secure access to endpoints exposed by FIWARE generic enablers. Users (or other actors) must log in and use a token to gain access to the services. The application code created in the previous tutorial is expanded to authenticate users throughout a distributed system. The design of FIWARE Wilma - a PEP Proxy is discussed, and the parts of the Keyrock GUI and REST API relevant to authenticating other services are described in detail.
cUrl commands are used throughout to access the Keyrock and Wilma REST APIs - Postman documentation for these calls is also available.

![]()
Securing Microservices with a PEP Proxy
"Too many cooks spoil the broth."
— Proverb
The previous tutorial demonstrated that it is possible to Permit or Deny access to resources based
on an authenticated user identifying themselves within an application. It was simply a matter of the code following a
different line of execution if the access_token was not found (Level 1 - Authentication Access), or confirming that
a given access_token had appropriate rights (Level 2 - Basic Authorization). The same method of securing access can
be applied by placing a Policy Enforcement Point (PEP) in front of other services within a FIWARE-based Smart Solution.
A PEP Proxy lies in front of a secured resource and is an endpoint found at "well-known" public location. It serves as a gatekeeper for resource access. Users or other actors must supply sufficient information to the PEP Proxy to allow their request to succeed and pass through the PEP proxy. The PEP proxy then passes the request on to the real location of the secured resource itself - the actual location of the secured resource is unknown to the outside user - it could be held in a private network behind the PEP proxy or found on a different machine altogether.
FIWARE Wilma is a simple implementation of a PEP proxy designed to work with the FIWARE Keyrock Generic Enabler. Whenever a user tries to gain access to the resource behind the PEP proxy, the PEP will describe the user's attributes to the Policy Decision Point (PDP), request a security decision, and enforce the decision. (Permit or Deny). There is minimal disruption of access for authorized users - the response received is the same as if they had accessed the secured service directly. Unauthorized users are simply returned a 401 - Unauthorized response.
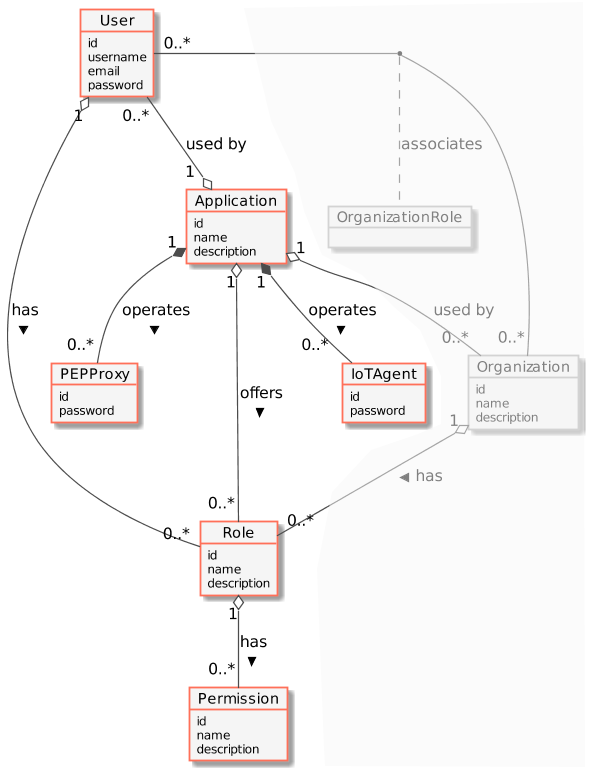
Standard Concepts of Identity Management
The following common objects are found with the Keyrock Identity Management database:
- User - Any signed-up user able to identify themselves with an eMail and password. Users can be assigned rights individually or as a group.
- Application - Any securable FIWARE application consisting of a series of microservices.
- Organization - A group of users who can be assigned a series of rights. Altering the rights of the organization effects the access of all users of that organization.
- OrganizationRole - Users can either be members or admins of an organization - Admins are able to add and remove users from their organization, members merely gain the roles and permissions of an organization. This allows each organization to be responsible for their members and removes the need for a super-admin to administer all rights.
- Role - A role is a descriptive bucket for a set of permissions. A role can be assigned to either a single user or an organization. A signed-in user gains all the permissions from all of their own roles plus all the roles associated to their organization.
- Permission - An ability to do something on a resource within the system.
Additionally, two further non-human application objects can be secured within a FIWARE application:
- IoTAgent - a proxy between IoT Sensors and the Context Broker.
- PEPProxy - a middleware for use between generic enablers challenging the rights of a user.
The relationship between the objects can be seen below - the entities marked in red are used directly within this tutorial:
Video : Introduction to Wilma PEP Proxy
![]()
Click on the image above to see an introductory video.
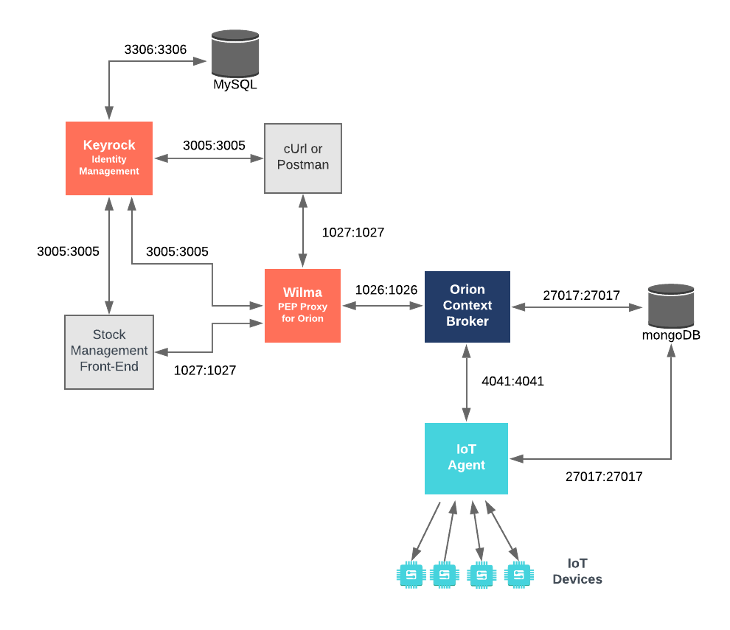
Architecture
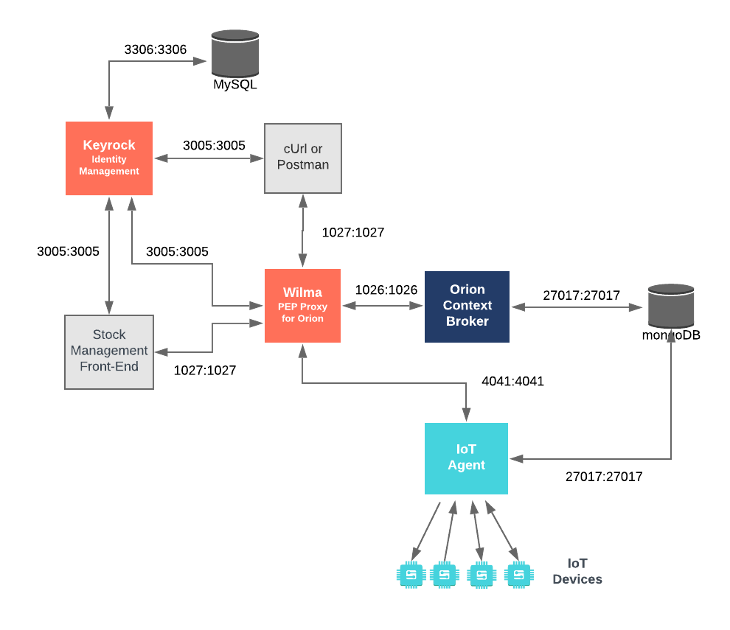
This application protects access to the existing Stock Management and Sensors-based application by adding PEP Proxy instances around the services created in previous tutorials and uses data pre-populated into the MySQL database used by Keyrock. It will make use of four FIWARE components - the Orion Context Broker,the IoT Agent for JSON, the Keyrock Generic enabler and adds one or two instances Wilma PEP Proxy dependent upon which interfaces are to be secured. Usage of the Orion Context Broker is sufficient for an application to qualify as “Powered by FIWARE”.
Both the Orion Context Broker and the IoT Agent rely on open source MongoDB technology to keep persistence of the information they hold. We will also be using the dummy IoT devices created in the previous tutorial. Keyrock uses its own MySQL database.
Therefore, the overall architecture will consist of the following elements:
- The FIWARE Orion Context Broker which will receive requests using NGSI-v2.
- The FIWARE IoT Agent for JSON which will receive southbound requests using NGSI-v2 and convert them to JSON commands for the devices.
- FIWARE Keyrock offer a complement Identity Management System
including:
- An OAuth2 authentication system for Applications and Users.
- A site graphical frontend for Identity Management Administration.
- An equivalent REST API for Identity Management via HTTP requests.
- FIWARE Wilma is a PEP Proxy securing access to the Orion and/or IoT Agent microservices.
- The underlying MongoDB database :
- Used by the Orion Context Broker to hold context data information such as data entities, subscriptions and registrations.
- Used by the IoT Agent to hold device information such as device URLs and Keys.
- A MySQL database :
- Used to persist user identities, applications, roles and permissions.
- The Stock Management Frontend does the following:
- Displays store information.
- Shows which products can be bought at each store.
- Allows users to "buy" products and reduce the stock count.
- Allows authorized users into restricted areas.
- A webserver acting as set of dummy IoT devices using the JSON protocol running over HTTP - access to certain resources is restricted.
Since all interactions between the services are initiated by HTTP requests, the services can be containerized and run from exposed ports.
The specific architecture of each section of the tutorial is discussed below.
Start Up
To start the installation, do the following:
#!/bin/bash
git clone https://github.com/FIWARE/tutorials.PEP-Proxy.git
cd tutorials.PEP-Proxy
git checkout NGSI-v2

./services create
Note The initial creation of Docker images can take up to three minutes
Thereafter, all services can be initialized from the command-line by running the services Bash script provided within the repository:
./services [orion|orion-kong|northport|southport]
Where <command> will vary depending upon the exercise we wish to activate.
Note: If you want to clean up and start over again you can do so with the following command:
./services stop
Dramatis Personae
The following people at test.com legitimately have accounts within the Application:
- Alice, she will be the Administrator of the Keyrock Application.
- Bob, the Regional Manager of the supermarket chain - he has several store managers under him:
- Manager1
- Manager2
- Charlie, the Head of Security of the supermarket chain - he has several store detectives under him:
- Detective1
- Detective2
| Name | Password | |
|---|---|---|
| alice | alice-the-admin@test.com |
test |
| bob | bob-the-manager@test.com |
test |
| charlie | charlie-security@test.com |
test |
| manager1 | manager1@test.com |
test |
| manager2 | manager2@test.com |
test |
| detective1 | detective1@test.com |
test |
| detective2 | detective2@test.com |
test |
The following people at example.com have signed up for accounts, but have no reason to be granted access:
- Eve - Eve the Eavesdropper.
- Mallory - Mallory the malicious attacker.
- Rob - Rob the Robber.
| Name | Password | |
|---|---|---|
| eve | eve@example.com |
test |
| mallory | mallory@example.com |
test |
| rob | rob@example.com |
test |
Two organizations have also been set up by Alice:
| Name | Description | UUID |
|---|---|---|
| Security | Security Group for Store Detectives | security-team-0000-0000-000000000000 |
| Management | Management Group for Store Managers | managers-team-0000-0000-000000000000 |
One application, with appropriate roles and permissions has also been created:
| Key | Value |
|---|---|
| Client ID | tutorial-dckr-site-0000-xpresswebapp |
| Client Secret | tutorial-dckr-site-0000-clientsecret |
| URL | http://localhost:3000 |
| RedirectURL | http://localhost:3000/login |
To save time, the data creating users and organizations from the previous tutorial has been downloaded and is automatically persisted to the MySQL database on start-up so the assigned UUIDs do not change and the data does not need to be entered again.
The Keyrock MySQL database deals with all aspects of application security including storing users, password etc.; defining access rights and dealing with OAuth2 authorization protocols. The complete database relationship diagram can be found here.
To refresh your memory about how to create users and organizations and applications, you can log in at
http://localhost:3005/idm using the account alice-the-admin@test.com with a password of test.
and look around.
Logging In to Keyrock using the REST API
Enter a username and password to enter the application. The default super-user has the values alice-the-admin@test.com
and test. The URL https://localhost:3443/v1/auth/tokens should also work in a secure system.
Create Token with Password
The following example logs in using the Admin Super-User:
1 Request:
curl -iX POST \
  'http://localhost:3005/v1/auth/tokens' \
  -H 'Content-Type: application/json' \
  -d '{
  "name": "alice-the-admin@test.com",
  "password": "test"
}'
Response:
Tip: Use jq to format the JSON responses in this tutorial. Pipe the result by appending
| jq '.'
The response header returns an X-Subject-token which identifies who has logged on the application. This token is
required in all subsequent requests to gain access:
HTTP/1.1 201 Created
X-Subject-Token: d848eb12-889f-433b-9811-6a4fbf0b86ca
Content-Type: application/json; charset=utf-8
Content-Length: 138
ETag: W/"8a-TVwlWNKBsa7cskJw55uE/wZl6L8"
Date: Mon, 30 Jul 2018 12:07:54 GMT
Connection: keep-alive
{
    "token": {
        "methods": ["password"],
        "expires_at": "2018-07-30T13:02:37.116Z"
    },
    "idm_authorization_config": {
        "level": "basic",
        "authzforce": false
    }
}
Get Token Info
Once a user has logged in, the presence of a (time-limited) token is sufficient to find out more information about the user.
You can use the long-lasting X-Auth-token=aaaaaaaa-aaaa-aaaa-aaaa-aaaaaaaaaaaa to pretend to be Alice throughout this
tutorial. Both {{X-Auth-token}} and {{X-Subject-token}} can be set to the same value in the case that Alice is
making an enquiry about herself.
2 Request:
curl -X GET \
  'http://localhost:3005/v1/auth/tokens' \
  -H 'Content-Type: application/json' \
  -H 'X-Auth-token: {{X-Auth-token}}' \
  -H 'X-Subject-token: {{X-Subject-token}}'
Response:
The response will return the details of the associated user:
{
    "access_token": "aaaaaaaa-aaaa-aaaa-aaaa-aaaaaaaaaaaa",
    "expires": "2036-07-30T12:04:45.000Z",
    "valid": true,
    "User": {
        "id": "aaaaaaaa-good-0000-0000-000000000000",
        "username": "alice",
        "email": "alice-the-admin@test.com",
        "date_password": "2018-07-30T11:41:14.000Z",
        "enabled": true,
        "admin": true
    }
}
Managing PEP Proxies and IoT Agents
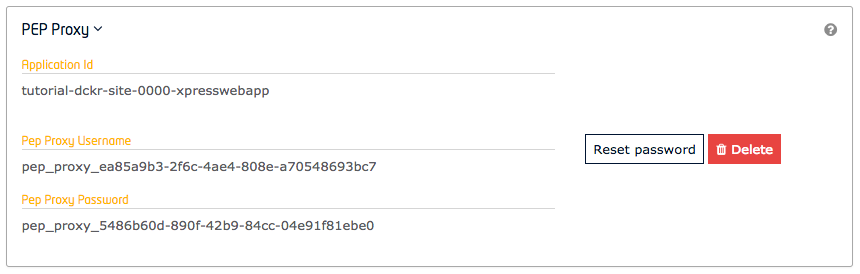
User accounts have been created in a previous tutorial. Non-human actors such as a PEP Proxy can be set up in the same manner. The account for each PEP Proxy, IoT Agent or IoT Sensor will merely consist of a Username and password linked to an application within Keyrock. PEP Proxy and IoT Agents accounts can be created by using either the Keyrock GUI or by using the REST API.
Video : Wilma PEP Proxy Configuration
![]()
Click on the image above to see a video about configuring the Wilma PEP Proxy using the Keyrock GUI.
Managing PEP Proxies and IoT Agents - Start Up
To start the system run the following command:
./services orion
This will start up Keyrock with a series of users. There are already two existing applications and an existing PEP Proxy Account associated with the application.
PEP Proxy CRUD Actions
GUI
Once signed-in, users are able to create and update PEP Proxies associated to their applications for themselves.
REST API
Alternatively, the standard CRUD actions are assigned to the appropriate HTTP verbs (POST, GET, PATCH and DELETE) under
the /v1/applications/{{application-id}}/pep_proxies endpoint.
Create a PEP Proxy
To create a new PEP Proxy account within an application, send a POST request to the
/v1/applications/{{application-id}}/pep_proxies endpoint along with the X-Auth-token header from a previously logged
in administrative user.
3 Request:
curl -iX POST \
  'http://localhost:3005/v1/applications/{{application-id}}/pep_proxies' \
  -H 'Content-Type: application/json' \
  -H 'X-Auth-token: {{X-Auth-token}}'
Response:
Provided there is no previously existing PEP Proxy account associated with the application, a new account will be
created with a unique id and password and the values will be returned to the response.
{
    "pep_proxy": {
        "id": "pep_proxy_ac80aaf8-0ac3-4bd8-8042-5e8f587679b7",
        "password": "pep_proxy_23d805e7-1b93-434a-8e69-0798dcdd6726"
    }
}
Read PEP Proxy details
Making a GET request to the /v1/applications/{{application-id}}/pep_proxies endpoint will return the details of the
associated PEP Proxy Account. The X-Auth-token must be supplied in the headers.
4 Request:
curl -X GET \
  'http://localhost:3005/v1/applications/{{application-id}}/pep_proxies/' \
  -H 'X-Auth-token: {{X-Auth-token}}'
Response:
{
    "pep_proxy": {
        "id": "pep_proxy_f84bcba2-3300-4f13-a4bb-7bdbd358b201",
        "oauth_client_id": "tutorial-dckr-site-0000-xpresswebapp"
    }
}
Reset Password of a PEP Proxy
To renew the password of a PEP Proxy Account, make a PATCH request to the
/v1/applications/{{application-id}}/pep_proxies endpoint will return the details of the associated PEP Proxy Account.
The X-Auth-token must be supplied in the headers.
5 Request:
curl -X PATCH \
  'http://localhost:3005/v1/applications/{{application-id}}/pep_proxies' \
  -H 'Content-Type: application/json' \
  -H 'X-Auth-token: {{X-Auth-token}}'
Response:
The response returns a new password for the PEP Proxy Account:
{
    "new_password": "pep_proxy_2bc8996e-29bf-4195-ac39-d1116e429602"
}
Delete a PEP Proxy
An existing PEP Proxy Account can be deleted by making a DELETE request to the
/v1/applications/{{application-id}}/pep_proxies endpoint. The X-Auth-token must be supplied in the headers.
6 Request:
curl -X DELETE \
  'http://localhost:3005/v1/applications/{{application-id}}/pep_proxies' \
  -H 'Content-Type: application/json' \
  -H 'X-Auth-token: {{X-Auth-token}}'
IoT Agent CRUD Actions
GUI
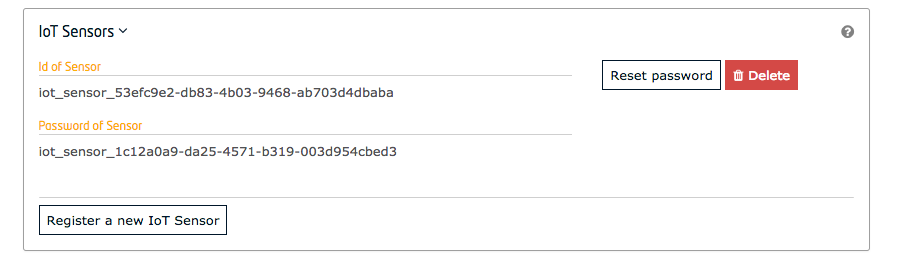
In a similar manner to PEP Proxy creation, signed-in, users are able to create and update IoT Sensor Accounts associated to their applications.
REST API
Alternatively, the standard CRUD actions are assigned to the appropriate HTTP verbs (POST, GET, PATCH and DELETE) under
the /v1/applications/{{application-id}}/iot_agents endpoint.
Create an IoT Agent
To create a new IoT Agent account within an application, send a POST request to the
/v1/applications/{{application-id}}/iot_agents endpoint along with the X-Auth-token header from a previously logged
in administrative user.
7 Request:
curl -X POST \
  'http://localhost:3005/v1/applications/{{application-id}}/iot_agents' \
  -H 'Content-Type: application/json' \
  -H 'X-Auth-token: {{X-Auth-token}}'
Response:
A new account will be created with a unique id and password and the values will be returned to the response.
{
    "iot": {
        "id": "iot_sensor_f1d0ca9e-b519-4a8d-b6ae-1246e443dd7e",
        "password": "iot_sensor_8775b438-6e66-4a6e-87c2-45c6525351ee"
    }
}
Read IoT Agent details
Making a GET request the /v1/applications/{{application-id}}/iot_agents/{{iot-agent-id}} endpoint will return the
details of the associated IoT Agent Account. The X-Auth-token must be supplied in the headers.
8 Request:
curl -X GET \
  'http://localhost:3005/v1/applications/{{application-id}}/iot_agents/{{iot-agent-id}}' \
  -H 'X-Auth-token: {{X-Auth-token}}'
Response:
{
    "iot": {
        "id": "iot_sensor_00000000-0000-0000-0000-000000000000",
        "oauth_client_id": "tutorial-dckr-site-0000-xpresswebapp"
    }
}
List IoT Agents
A list of all IoT Agents associated with an application can be obtained by making a GET request the
/v1/applications/{{application-id}}/iot_agents endpoint. The X-Auth-token must be supplied in the headers.
9 Request:
curl -X GET \
  'http://localhost:3005/v1/applications/{{application-id}}/iot_agents' \
  -H 'X-Auth-token: {{X-Auth-token}}'
Response:
{
    "iots": [
        {
            "id": "iot_sensor_00000000-0000-0000-0000-000000000000"
        },
        {
            "id": "iot_sensor_c0fa0a77-ea9e-4a82-8118-b4d3c6b230b1"
        }
    ]
}
Reset Password of an IoT Agent
10 Request:
To renew the password of an individual IoT Agent Account, make a PATCH request to the
/v1/applications/{{application-id}}//iot_agents/{{iot-agent-id}} endpoint. The X-Auth-token must be supplied in the
headers.
curl -iX PATCH \
  'http://localhost:3005/v1/applications/{{application-id}}/iot_agents/{{iot-agent-id}}' \
  -H 'Content-Type: application/json' \
  -H 'X-Auth-token: {{X-Auth-token}}'
Response:
The response returns a new password for the IoT Agent account.
{
    "new_password": "iot_sensor_114cb79c-bf69-444a-82a1-e6e85187dacd"
}
Delete an IoT Agent
An existing IoT Agent Account can be deleted by making a DELETE request to the
/v1/applications/{{application-id}}/iot_agents/{{iot-agent-id}} endpoint. The X-Auth-token must be supplied in the
headers.
11 Request:
curl -X DELETE \
  'http://localhost:3005/v1/applications/{{application-id}}/iot_agents/{{iot-agent-id}}' \
  -H 'X-Auth-token: {{X-Auth-token}}'
Wilma PEP - Secure traffic between an Application and the Context Broker
Securing Orion - Wilma PEP Proxy Configuration
The orion-proxy container is an instance of FIWARE Wilma listening on port 1027, it is configured to forward
traffic to orion on port 1026, which is the default port that the Orion Context Broker is listening to for NGSI
Requests.
orion-proxy:
    image: quay.io/fiware/pep-proxy
    container_name: fiware-orion-proxy
    hostname: orion-proxy
    networks:
        default:
            ipv4_address: 172.18.1.10
    depends_on:
        - keyrock
    ports:
        - '1027:1027'
    expose:
        - '1027'
    environment:
        - PEP_PROXY_APP_HOST=orion
        - PEP_PROXY_APP_PORT=1026
        - PEP_PROXY_PORT=1027
        - PEP_PROXY_IDM_HOST=keyrock
        - PEP_PROXY_HTTPS_ENABLED=false
        - PEP_PROXY_AUTH_ENABLED=false
        - PEP_PROXY_IDM_SSL_ENABLED=false
        - PEP_PROXY_IDM_PORT=3005
        - PEP_PROXY_APP_ID=tutorial-dckr-site-0000-xpresswebapp
        - PEP_PROXY_USERNAME=pep_proxy_00000000-0000-0000-0000-000000000000
        - PEP_PASSWORD=test
        - PEP_PROXY_PDP=idm
        - PEP_PROXY_MAGIC_KEY=1234
The PEP_PROXY_APP_ID and PEP_PROXY_USERNAME would usually be obtained by adding new entries to the application in
Keyrock, however, in this tutorial, they have been predefined by populating the MySQL database with data on
start-up.
The orion-proxy container is listening on a single port:
- The PEP Proxy Port -
1027is exposed purely for tutorial access - so that cUrl or Postman can request directly to the Wilma instance without being part of the same network.
| Key | Value | Description |
|---|---|---|
| PEP_PROXY_APP_HOST | orion |
The hostname of the service behind the PEP Proxy |
| PEP_PROXY_APP_PORT | 1026 |
The port of the service behind the PEP Proxy |
| PEP_PROXY_PORT | 1027 |
The port that the PEP Proxy is listening on |
| PEP_PROXY_IDM_HOST | keyrock |
The hostname for the Identity Manager |
| PEP_PROXY_HTTPS_ENABLED | false |
Whether the PEP Proxy itself is running under HTTPS |
| PEP_PROXY_AUTH_ENABLED | false |
Whether the PEP Proxy is checking for Authorization |
| PEP_PROXY_IDM_SSL_ENABLED | false |
Whether the Identity Manager is running under HTTPS |
| PEP_PROXY_IDM_PORT | 3005 |
The Port for the Identity Manager instance |
| PEP_PROXY_APP_ID | tutorial-dckr-site-0000-xpresswebapp |
|
| PEP_PROXY_USERNAME | pep_proxy_00000000-0000-0000-0000-000000000000 |
The Username for the PEP Proxy |
| PEP_PASSWORD | test |
The Password for the PEP Proxy |
| PEP_PROXY_PDP | idm |
The Type of service offering the Policy Decision Point |
| PEP_PROXY_MAGIC_KEY | 1234 |
For this example, the PEP Proxy is checking for Level 1 - Authentication Access not Level 2 - Basic Authorization or Level 3 - Advanced Authorization.
Securing Orion - Application Configuration
The tutorial application has already been registered in Keyrock, programmatically the tutorial application will be
making requests to the Wilma PEP Proxy in front of the Orion Conext Broker. Every request must now include an
additional access_token header.
tutorial-app:
    image: quay.io/fiware/tutorials.context-provider
    hostname: iot-sensors-app
    container_name: tutorial-app
    depends_on:
        - orion-proxy
        - iot-agent
        - keyrock
    networks:
        default:
            ipv4_address: 172.18.1.7
            aliases:
                - tutorial
    expose:
        - '3000'
        - '3001'
    ports:
        - '3000:3000'
        - '3001:3001'
    environment:
        - 'WEB_APP_PORT=3000'
        - 'SECURE_ENDPOINTS=true'
        - 'CONTEXT_BROKER=http://orion-proxy:1027/v2'
        - 'KEYROCK_URL=http://localhost'
        - 'KEYROCK_IP_ADDRESS=http://172.18.1.5'
        - 'KEYROCK_PORT=3005'
        - 'KEYROCK_CLIENT_ID=tutorial-dckr-site-0000-xpresswebapp'
        - 'KEYROCK_CLIENT_SECRET=tutorial-dckr-site-0000-clientsecret'
        - 'CALLBACK_URL=http://localhost:3000/login'
All of the tutorial container settings have been described in previous tutorials. One important change is necessary
however, rather than accessing Orion directly on the default port 1026 as shown in all previous tutorials, all
context broker traffic is now sent to orion-proxy on port 1027. As a reminder, the relevant settings are detailed
below:
| Key | Value | Description |
|---|---|---|
| WEB_APP_PORT | 3000 |
Port used by web-app which displays the login screen & etc. |
| KEYROCK_URL | http://localhost |
This is URL of the Keyrock Web frontend itself, used for redirection when forwarding users |
| KEYROCK_IP_ADDRESS | http://172.18.1.5 |
This is URL of the Keyrock OAuth Communications |
| KEYROCK_PORT | 3005 |
This is the port that Keyrock is listening on. |
| KEYROCK_CLIENT_ID | tutorial-dckr-site-0000-xpresswebapp |
The Client ID defined by Keyrock for this application |
| KEYROCK_CLIENT_SECRET | tutorial-dckr-site-0000-clientsecret |
The Client Secret defined by Keyrock for this application |
| CALLBACK_URL | http://localhost:3000/login |
The callback URL used by Keyrock when a challenge has succeeded. |
Securing Orion - Start up
To start the system with a PEP Proxy protecting access to Orion, run the following command:
./services orion
Video : Securing A REST API
![]()
Click on the image above to see a video about securing a REST API using the Wilma PEP Proxy.
Wilma PEP Proxy - No Access to Orion without an Access Token
Secured Access can be ensured by requiring all requests to the secured service are made indirectly via a Wilma PEP Proxy
(in this case the PEP Proxy is found in front of the Context Broker). Requests must include an X-Auth-Token, failure
to present a valid token results in a denial of access.
12 Request
If a request to the PEP Proxy is made without any access token as shown:
curl -X GET \
  http://localhost:1027/v2/entities/urn:ngsi-ld:Store:001?options=keyValues
Response
The response is a 401 Unauthorized error code, with the following explanation:
Auth-token not found in request header
Keyrock - User Obtains an Access Token
13 Request
To log in to the application using the user-credentials flow send a POST request to Keyock using the oauth2/token
endpoint with the grant_type=password. For example to log-in as Alice the Admin:
curl -iX POST \
  'http://localhost:3005/oauth2/token' \
  -H 'Accept: application/json' \
  -H 'Authorization: Basic dHV0b3JpYWwtZGNrci1zaXRlLTAwMDAteHByZXNzd2ViYXBwOnR1dG9yaWFsLWRja3Itc2l0ZS0wMDAwLWNsaWVudHNlY3JldA==' \
  -H 'Content-Type: application/x-www-form-urlencoded' \
  --data "username=alice-the-admin@test.com&password=test&grant_type=password"
Response
The response returns an access code to identify the user:
{
    "access_token": "a7e22dfe2bd7d883c8621b9eb50797a7f126eeab",
    "token_type": "Bearer",
    "expires_in": 3599,
    "refresh_token": "05e386edd9f95ed0e599c5004db8573e86dff874"
}
This can also be done by entering the Tutorial Application on http:/localhost and logging in using any of the OAuth2 grants on the page. A successful log-in will return an access token.
Wilma PEP Proxy - Accessing Orion with an Access Token
If a request to Wilma is made including a valid access token in the X-Auth-Token header as shown, the request is
permitted and the service behind the PEP Proxy (in this case the Orion Context Broker) will return the data as expected.
14 Request
curl -X GET \
  http://localhost:1027/v2/entities/urn:ngsi-ld:Store:001?options=keyValues \
  -H 'X-Auth-Token: {{X-Access-token}}'
Response:
{
    "id": "urn:ngsi-ld:Store:001",
    "type": "Store",
    "address": {
        "streetAddress": "Bornholmer Straße 65",
        "addressRegion": "Berlin",
        "addressLocality": "Prenzlauer Berg",
        "postalCode": "10439"
    },
    "location": {
        "type": "Point",
        "coordinates": [13.3986, 52.5547]
    },
    "name": "Bösebrücke Einkauf"
}
Securing Orion - Sample Code
When a User logs in to the application using the User Credentials Grant, an access_token is obtained which identifies
the User. The access_token is stored in session:
function userCredentialGrant(req, res) {
    debug('userCredentialGrant');

    const email = req.body.email;
    const password = req.body.password;

    oa.getOAuthPasswordCredentials(email, password).then((results) => {
        req.session.access_token = results.access_token;
        return;
    });
}
For each subsequent request, the access_token is supplied in the X-Auth-Token Header:
function setAuthHeaders(req) {
    const headers = {};
    if (req.session.access_token) {
        headers['X-Auth-Token'] = req.session.access_token;
    }
    return headers;
}
For example, when buying an item, two requests are made, the same X-Auth-Token Header must be added to each request -
therefore the User can be identified and access granted.
async function buyItem(req, res) {
    const inventory = await retrieveEntity(
        req.params.inventoryId,
        {
            options: 'keyValues',
            type: 'InventoryItem'
        },
        setAuthHeaders(req)
    );
    const count = inventory.shelfCount - 1;

    await updateExistingEntityAttributes(
        req.params.inventoryId,
        { shelfCount: { type: 'Integer', value: count } },
        {
            type: 'InventoryItem'
        },
        setAuthHeaders(req)
    );
    res.redirect(`/app/store/${inventory.refStore}/till`);
}
Kong PEP - Secure traffic between an Application and the Context Broker
FIWARE is not limited to using a single security stack. Since the authorization token is held in a header, security is effectively orthogonal to processing of a context broker, and the developer is free to chose their preferred Identity Manager, PDP and PEP. As an example, we can swap out the Wilma PEP Proxy and use the Kong API Management tool in coordination with a Kong Plugin for Keyrock.
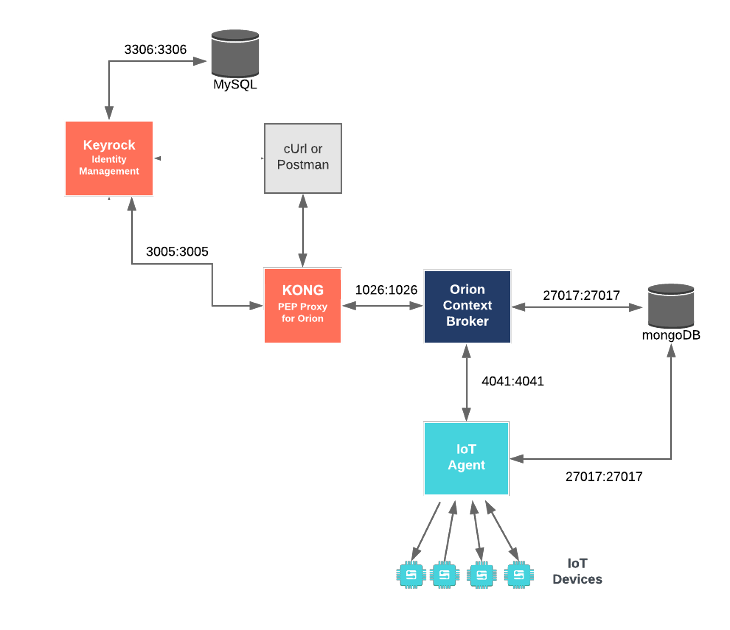
Securing Orion - Kong PEP Proxy Configuration
The kong-api-gateway container is an instance of Kong listening on port 8000, it includes a plugin to use
Keyrock as a PDP and is configured to forward traffic to orion on port 1026, which is the default port that the
Orion Context Broker is listening to for NGSI Requests.
kong-api-gateway:
    image: quay.io/fiware/kong
    container_name: fiware-orion-kong
    hostname: orion-proxy
    networks:
        default:
            ipv4_address: 172.18.1.10
    ports:
        - '8000:8000/tcp'
    environment:
        - KONG_DATABASE=off
        - KONG_DECLARATIVE_CONFIG=/etc/kong/kong.yaml
        - KONG_PLUGINS=bundled,pep-plugin
        - KONG_PLUGINSERVER_NAMES= pep-plugin
        - 'KONG_PLUGINSERVER_PEP_PLUGIN_QUERY_CMD=/go-plugins/pep-plugin -dump'
        - 'KONG_PLUGINSERVER_PEP_PLUGIN_START_CMD=/go-plugins/pep-plugin'
        - KONG_LOG_LEVEL=debug
The declarative config holds additional information such as the hostname and location of the keyrockPDP and the name
and port of the proxied broker (orion)
services:
    - host: 'orion'
      name: 'orion-oidc'
      port: 1026
      protocol: http
      routes:
          - name: orion-oidc
            paths:
                - /orion
            strip_path: true
      plugins:
          - name: pep-plugin
            config:
                authorizationendpointtype: Keyrock
                authorizationendpointaddress: http://keyrock:3005/user/
                keyrockappid: tutorial-dckr-site-0000-xpresswebapp
                pathprefix: /orion
The keyrockappid would usually be obtained by adding a new entry to the application in Keyrock, however, in this
tutorial, they have been predefined by populating the MySQL database with data on start-up.
The kong-api-gateway container is listening on a single port:
- The API Gateway Port -
8000is exposed purely for tutorial access - so that cUrl or Postman can make requests directly to the Kong instance without being part of the same network.
| Key | Value | Description |
|---|---|---|
| KONG_DATABASE | off |
Whether to use a database to hold the configuration |
| KONG_DECLARATIVE_CONFIG | /etc/kong/kong.yaml |
The location of the configuration file |
| KONG_PLUGINS | bundled,pep-plugin |
List of included plugins |
| KONG_PLUGINSERVER_NAMES | pep-plugin |
Names of configurable pluins |
| KONG_PLUGINSERVER_PEP_PLUGIN_QUERY_CMD | go-plugins/pep-plugin -dump |
Command for querying the plugin |
| KONG_PLUGINSERVER_PEP_PLUGIN_START_CMD | /go-plugins/pep-plugin |
Command issued at plugin start up |
| KONG_LOG_LEVEL | debug |
Debug level of Kong |
This Docker image of Kong is generated to include several FIWARE specific plugins. Kong Plugins enable the gateway to be extended and apply multiple security mechanisms.
Securing Orion - Start up
To start the system with a Kong API Gateway protecting access to Orion, run the following command:
./services orion-kong
Kong PEP Proxy - No Access to Orion without an Access Token
Secured Access can be ensured by requiring all requests to the secured service are made indirectly via the API Gateway.
Due to the manner in which Kong has been configured in the kong.yaml, all Context Broker access can be made under the
path /orion - for example to retrieve all entities a user would use http://localhost:8000/orion/v2/entities/ (in
this case Kong is acting as a PEP Proxy is found in front of the Context Broker).
Successful requests must include an Authentiction header, failure to present a valid token results in a denial of
access.
16 Request:
If a request to Kong is made without any access token as shown:
curl -X GET \
  'http://localhost:8000/orion/v2/entities/urn:ngsi-ld:Store:001?options=keyValues'
Response:
The response is a 401 Unauthorized error code, with the following explanation:
Request forbidden by authorization service Keyrock.
Keyrock - User Obtains an Access Token
17 Request:
To log in to the application using the user-credentials flow send a POST request to Keyrock using the oauth2/token
endpoint with the grant_type=password. For example to log-in as Alice the Admin:
curl -iX POST \
  'http://localhost:3005/oauth2/token' \
  -H 'Accept: application/json' \
  -H 'Authorization: Basic dHV0b3JpYWwtZGNrci1zaXRlLTAwMDAteHByZXNzd2ViYXBwOnR1dG9yaWFsLWRja3Itc2l0ZS0wMDAwLWNsaWVudHNlY3JldA==' \
  -H 'Content-Type: application/x-www-form-urlencoded' \
  --data "username=bob-the-manager@test.com&password=test&grant_type=password"
Response:
The response returns an access code to identify the user:
{
    "access_token": "a7e22dfe2bd7d883c8621b9eb50797a7f126eeab",
    "token_type": "Bearer",
    "expires_in": 3599,
    "refresh_token": "05e386edd9f95ed0e599c5004db8573e86dff874"
}
This can also be done by entering the Tutorial Application on http:/localhost and logging in using any of the OAuth2 grants on the page. A successful log-in will return an access token.
Kong PEP Proxy - Accessing Orion with an Access Token
If a request to Kong is made including a valid access token in the X-Auth-Token header as shown, the request is
permitted and the service behind the PEP Proxy (in this case the Orion Context Broker) will return the data as expected.
18 Request:
curl -X GET \
  'http://localhost:8000/orion/v2/entities/urn:ngsi-ld:Store:001?options=keyValues' \
  -H 'Authorization: Bearer {{X-Access-token}}'
Response:
{
    "id": "urn:ngsi-ld:Store:001",
    "type": "Store",
    "address": {
        "streetAddress": "Bornholmer Straße 65",
        "addressRegion": "Berlin",
        "addressLocality": "Prenzlauer Berg",
        "postalCode": "10439"
    },
    "location": {
        "type": "Point",
        "coordinates": [13.3986, 52.5547]
    },
    "name": "Bösebrücke Einkauf"
}
Securing an IoT Agent South Port
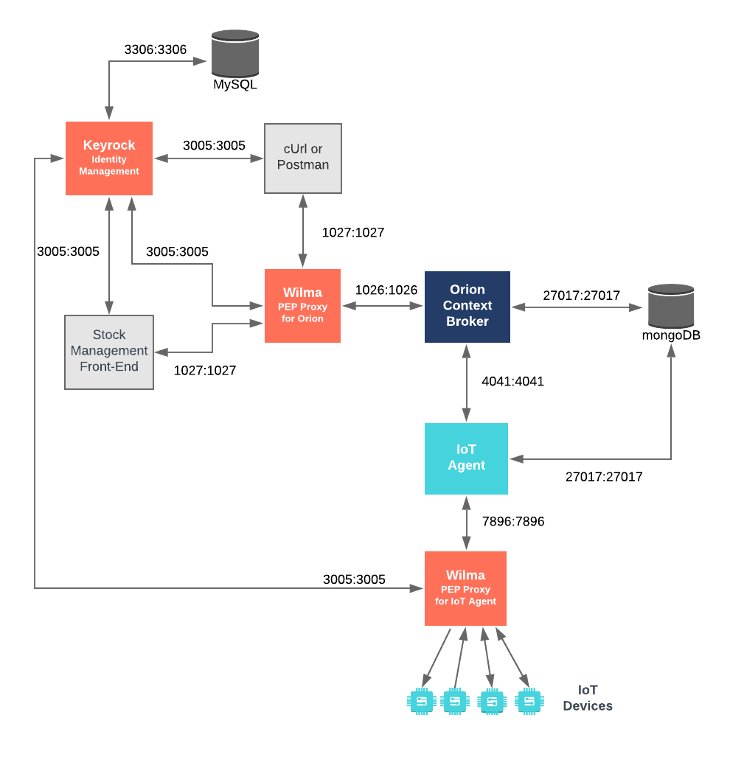
Securing an IoT Agent South Port - PEP Proxy Configuration
The iot-agent-proxy container is an instance of FIWARE Wilma listening on port 7897, it is configured to forward
traffic to iot-agent on port 7896, which is the default port that the JSON agent is listening to for HTTP Requests.
iot-agent-proxy:
    image: quay.io/fiware/pep-proxy
    container_name: fiware-iot-agent-proxy
    hostname: iot-agent-proxy
    networks:
        default:
            ipv4_address: 172.18.1.11
    depends_on:
        - keyrock
    ports:
        - '7897:7897'
    expose:
        - '7897'
    environment:
        - PEP_PROXY_APP_HOST=iot-agent
        - PEP_PROXY_APP_PORT=7896
        - PEP_PROXY_PORT=7897
        - PEP_PROXY_IDM_HOST=keyrock
        - PEP_PROXY_HTTPS_ENABLED=false
        - PEP_PROXY_AUTH_ENABLED=false
        - PEP_PROXY_IDM_SSL_ENABLED=false
        - PEP_PROXY_IDM_PORT=3005
        - PEP_PROXY_APP_ID=tutorial-dckr-site-0000-xpresswebapp
        - PEP_PROXY_USERNAME=pep_proxy_00000000-0000-0000-0000-000000000000
        - PEP_PASSWORD=test
        - PEP_PROXY_PDP=idm
        - PEP_PROXY_MAGIC_KEY=1234
The PEP_PROXY_APP_ID and PEP_PROXY_USERNAME would usually be obtained by adding new entries to the application in
Keyrock, however, in this tutorial, they have been predefined by populating the MySQL database with data on
start-up.
The iot-agent-proxy container is listening on a single port:
- The PEP Proxy Port -
7897is exposed purely for tutorial access - so that cUrl or Postman can request directly to this Wilma instance without being part of the same network.
| Key | Value | Description |
|---|---|---|
| PEP_PROXY_APP_HOST | iot-agent |
The hostname of the service behind the PEP Proxy |
| PEP_PROXY_APP_PORT | 7896 |
The port of the service behind the PEP Proxy |
| PEP_PROXY_PORT | 7897 |
The port that the PEP Proxy is listening on |
| PEP_PROXY_IDM_HOST | keyrock |
The hostname for the Identity Manager |
| PEP_PROXY_HTTPS_ENABLED | false |
Whether the PEP Proxy is running under HTTPS |
| PEP_PROXY_AUTH_ENABLED | false |
Whether the PEP Proxy is checking for Authorization |
| PEP_PROXY_IDM_SSL_ENABLED | false |
Whether the Identity Manager is running under HTTPS |
| PEP_PROXY_IDM_PORT | 3005 |
The Port for the Identity Manager instance |
| PEP_PROXY_APP_ID | tutorial-dckr-site-0000-xpresswebapp |
|
| PEP_PROXY_USERNAME | pep_proxy_00000000-0000-0000-0000-000000000000 |
The Username for the PEP Proxy |
| PEP_PASSWORD | test |
The Password for the PEP Proxy |
| PEP_PROXY_PDP | idm |
The Type of service offering the Policy Decision Point |
| PEP_PROXY_MAGIC_KEY | 1234 |
For this example, the PEP Proxy is checking for Level 1 - Authentication Access not Level 2 - Basic Authorization or Level 3 - Advanced Authorization.
Securing an IoT Agent South Port - Application Configuration
The tutorial application also plays the role of providing data from our dummy IoT Sensors. The IoT Sensors are making HTTP request containing commands and measurements in JSON syntax. An IoT Sensor username and password have already been registered in Keyrock, programmatically each sensor must obtain an OAuth2 access token and will then make requests to a second Wilma PEP Proxy in front of the IoT Agent.
tutorial-app:
    image: quay.io/fiware/tutorials.context-provider
    hostname: iot-sensors-app
    container_name: tutorial-app
    depends_on:
        - orion-proxy
        - iot-agent-proxy
        - keyrock
    networks:
        default:
            ipv4_address: 172.18.1.7
            aliases:
                - tutorial
    expose:
        - '3000'
        - '3001'
    ports:
        - '3000:3000'
        - '3001:3001'
    environment:
        - 'IOTA_HTTP_HOST=iot-agent-proxy'
        - 'IOTA_HTTP_PORT=7897'
        - 'DUMMY_DEVICES_PORT=3001' # Port used by the dummy IOT devices to receive commands
        - 'DUMMY_DEVICES_TRANSPORT=HTTP' # Default transport used by dummy Io devices
        - 'DUMMY_DEVICES_API_KEY=4jggokgpepnvsb2uv4s40d59ov'
        - 'DUMMY_DEVICES_USER=iot_sensor_00000000-0000-0000-0000-000000000000'
        - 'DUMMY_DEVICES_PASSWORD=test'
The tutorial container hosts the dummy JSON sensors. Rather than accessing the IoT Agent directly on port 7896
as shown in all previous tutorials, all traffic is forwarded to iot-agent-proxy on port 7897. Most of the relevant
tutorial container settings have been described in previous tutorials, the DUMMY_DEVICES_USER and
DUMMY_DEVICES_PASSWORD are new additions.
| Key | Value | Description |
|---|---|---|
| IOTA_HTTP_HOST | iot-agent-proxy |
The hostname of the Wilma PEP Proxy protecting the IoT Agent for JSON |
| IOTA_HTTP_PORT | 7896 |
The port that the Wilma PEP Proxy protecting the IoT Agent is listening on |
| DUMMY_DEVICES_PORT | 3001 |
Port used by the dummy IoT devices to receive commands |
| DUMMY_DEVICES_TRANSPORT | HTTP |
Default transport used by dummy Io devices |
| DUMMY_DEVICES_API_KEY | 4jggokgpepnvsb2uv4s40d59ov |
Random security key used for JSON interactions - ensures the integrity of interactions between the devices and the IoT Agent |
| DUMMY_DEVICES_USER | iot_sensor_00000000-0000-0000-0000-000000000000 |
Username assigned to the device(s) in Keyrock |
| DUMMY_DEVICES_PASSWORD | test |
Password assigned to the device(s) in Keyrock |
The DUMMY_DEVICES_USER and DUMMY_DEVICES_PASSWORD would usually be obtained by adding new entries to the application
in Keyrock, however, in this tutorial, they have been predefined by populating the MySQL database with data on
start-up.
Securing IoT Agent - Start up
To start the system with a PEP Proxies protecting access to both Orion and the IoT Agent run the following command:
./services southport
Secure traffic between an IoT Sensor and an IoT Agent
Keyrock - IoT Sensor Obtains an Access Token
Logging in as an IoT Sensor follows the same user-credentials flow as for a User. To log in and identify the sensor
iot_sensor_00000000-0000-0000-0000-000000000000 with password test send a POST request to Keyock using the
oauth2/token endpoint with the grant_type=password:
19 Request:
curl -iX POST \
  'http://localhost:3005/oauth2/token' \
  -H 'Accept: application/json' \
  -H 'Authorization: Basic dHV0b3JpYWwtZGNrci1zaXRlLTAwMDAteHByZXNzd2ViYXBwOnR1dG9yaWFsLWRja3Itc2l0ZS0wMDAwLWNsaWVudHNlY3JldA==' \
  -H 'Content-Type: application/x-www-form-urlencoded' \
  --data "username=iot_sensor_00000000-0000-0000-0000-000000000000&password=test&grant_type=password"
Response
The response returns an access code to identify the device:
{
    "access_token": "a7e22dfe2bd7d883c8621b9eb50797a7f126eeab",
    "token_type": "Bearer",
    "expires_in": 3599,
    "refresh_token": "05e386edd9f95ed0e599c5004db8573e86dff874"
}
PEP Proxy - Accessing IoT Agent with an Access Token
This example simulates a secured request coming from the device motion001
The POST request to a PEP Proxy in front of the JSON IoT Agent identifies a previously provisioned resource
iot/dendpoint and passes a measurement for device motion001. The addition of the X-Auth-Token Header identifies
the source of the request as being registered in Keyrock, and therefore the measurement will be successfully passed on
to the IoT Agent itself.
20 Request:
curl -X POST \
  'http://localhost:7896/iot/json?k=1068318794&i=motion001' \
  -H 'Content-Type: text/plain' \
  -H 'X-Auth-Token: {{X-Access-token}}' \
  -d 'c|1'
Securing an IoT Agent South Port - Sample Code
When an IoT Sensor starts up, it must log in like any other user to obtain an access token:
const DUMMY_DEVICE_HTTP_HEADERS = { 'Content-Type': 'text/plain' };
function initSecureDevices() {
    Security.oa
        .getOAuthPasswordCredentials(process.env.DUMMY_DEVICES_USER, process.env.DUMMY_DEVICES_PASSWORD)
        .then((results) => {
            DUMMY_DEVICE_HTTP_HEADERS['X-Auth-Token'] = results.access_token;
            return;
        })
        .catch((error) => {
            debug(error);
            return;
        });
}
Each HTTP request thereafter includes the X-Auth-Token Header in the request identifying the IoT Sensor:
const options = {
    method: 'POST',
    url: UL_URL,
    qs: { k: UL_API_KEY, i: deviceId },
    headers: DUMMY_DEVICE_HTTP_HEADERS,
    body: state
};

request(options, (error) => {
    if (error) {
        debug(debugText + ' ' + error.code);
    }
});
Securing an IoT Agent North Port
Securing an IoT Agent North Port - IoT Agent Configuration
The iot-agent container is listening on port 4041, it is configured to forward traffic to orion-proxy on port
1027.
iot-agent:
    image: quay.io/fiware/iotagent-json:${JSON_VERSION}
    hostname: iot-agent
    container_name: fiware-iot-agent
    depends_on:
        - mongo-db
        - orion
    networks:
        - default
    ports:
        - '4041:4041'
        - '7896:7896'
    environment:
        - IOTA_CB_HOST=orion-proxy
        - IOTA_CB_PORT=1027
        - IOTA_NORTH_PORT=4041
        - IOTA_REGISTRY_TYPE=mongodb
        - IOTA_LOG_LEVEL=DEBUG
        - IOTA_TIMESTAMP=true
        - IOTA_CB_NGSI_VERSION=v2
        - IOTA_AUTOCAST=true
        - IOTA_MONGO_HOST=mongo-db
        - IOTA_MONGO_PORT=27017
        - IOTA_MONGO_DB=iotagentjson
        - IOTA_HTTP_PORT=7896
        - IOTA_PROVIDER_URL=http://iot-agent:4041
        - IOTA_AUTH_ENABLED=true
        - IOTA_AUTH_TYPE=oauth2
        - IOTA_AUTH_HEADER=Authorization
        - IOTA_AUTH_HOST=keyrock
        - IOTA_AUTH_PORT=3005
        - IOTA_AUTH_URL=http://keyrock:3005
        - IOTA_AUTH_TOKEN_PATH=/oauth2/token
        - IOTA_AUTH_PERMANENT_TOKEN=true
        - IOTA_AUTH_CLIENT_ID=tutorial-dckr-site-0000-xpresswebapp
        - IOTA_AUTH_CLIENT_SECRET=tutorial-dckr-host-0000-clientsecret
| Key | Value | Description |
|---|---|---|
| IOTA_AUTH_ENABLED | true |
Whether to use authorization on the north port |
| IOTA_AUTH_TYPE | oauth2 |
The type of authorization to be used (Keyrock uses OAuth2) |
| IOTA_AUTH_HEADER | Authorization |
The name of the header to be added to requests |
| IOTA_AUTH_HOST | keyrock |
The Identity Manager holding the application |
| IOTA_AUTH_PORT | 3005 |
The port the Identity Manager is listening on |
| IOTA_AUTH_URL | http://keyrock:3005 |
The URL for authentication requests |
| IOTA_AUTH_CLIENT_ID | tutorial-dckr-site-0000-xpresswebapp |
the ID of the applicantion within Keyrock |
| IOTA_AUTH_CLIENT_SECRET | tutorial-dckr-host-0000-clientsecret |
The client secret of the application within Keyrock |
| IOTA_AUTH_PERMANENT_TOKEN | true |
Whether to use permanent tokens |
| IOTA_AUTH_TOKEN_PATH | /oauth2/token |
the path to be used when requesting tokens |
Securing an IoT Agent North Port - Start up
To start the system with a PEP Proxy protecting access to between Orion and the IoT Agent North Port run the following command:
./services northport
Secure traffic between an IoT Agent and the Context Broker
Keyrock - Obtaining a permanent token
The Keyrock application has been configured to offer permanent tokens.
The standard Authorization: Basic header holds the base 64 concatenation of the client ID and secret. The parameter
scope=permanent is added to retrieve permanent tokens when available. The response contains an access_token which
can be used for device provisioning.
21 Request:
curl -X POST \
  http://localhost:3005/oauth2/token \
  -H 'Accept: application/json' \
  -H 'Authorization: Basic dHV0b3JpYWwtZGNrci1zaXRlLTAwMDAteHByZXNzd2ViYXBwOnR1dG9yaWFsLWRja3Itc2l0ZS0wMDAwLWNsaWVudHNlY3JldA==' \
  -d 'username=alice-the-admin@test.com&password=test&grant_type=password&scope=permanent'
Response:
{
    "access_token": "e37aeef5d48c9c1a3d4adf72626a8745918d4355",
    "token_type": "Bearer",
    "scope": ["permanent"]
}
IoT Agent - provisioning a trusted service group
The Access token (also known as a Trust Token) must be added to the service group. The resource and apikey
correspond to the values set-up within the service group provisioning stage. In this case the Motion sensor group had
been provisioned as shown:
{
    "apikey": "1068318794",
    "cbroker": "http://orion:1026",
    "entity_type": "Motion",
    "resource": "/iot/json"
}
22 Request:
Note: use the
access_tokenfrom the previous request.
curl -iX PUT \
  'http://localhost:4041/iot/services?resource=/iot/json&apikey=1068318794' \
  -H 'Content-Type: application/json' \
  -H 'fiware-service: openiot' \
  -H 'fiware-servicepath: /' \
  -d '{
     "cbroker": "http://orion-proxy:1027",
     "trust": "{{access_token}}"
}'
The Motion sensor requests are now sent via the orion-proxy and identify themselves using the generated trust token.
IoT Agent - provisioning a sensor
Once a trusted service group has been created, a device can be provisioned in the usual manner.
23 Request:
curl -iX POST \
  'http://localhost:4041/iot/devices' \
  -H 'Content-Type: application/json' \
  -H 'fiware-service: openiot' \
  -H 'fiware-servicepath: /' \
  -d '{
 "devices": [
   {
     "device_id":   "motion001",
     "entity_name": "urn:ngsi-ld:Motion:001",
     "entity_type": "Motion",
     "timezone":    "Europe/Berlin",
     "attributes": [
       { "object_id": "c", "name": "count", "type": "Integer" }
     ],
     "static_attributes": [
       { "name":"refStore", "type": "Relationship", "value": "urn:ngsi-ld:Store:001"}
     ]
   }
 ]
}
'