
![]()
Background: This tutorial does not use the NGSI-v2 interface directly. it covers background information about Roles and Permissions, which is then used in subsequent chapters.
Description: The tutorial explains how to create applications, and how to assign roles and permissions to them. It takes the users and organizations created in the previous tutorial and ensures that only legitimate users will have access to resources.
The tutorial demonstrates examples of interactions using the Keyrock GUI, as well cUrl commands used to access the Keyrock REST API - Postman documentation is also available.

![]()
What is Authorization?
"Too many cooks spoil the broth."
— Proverb
Authorization is the function of specifying access rights/privileges to resources related to information security.1 More formally, "to authorize" is to define an access policy. With identity management controlled via the FIWARE Keyrock Generic Enabler, User access is granted based on permissions assigned to a role.
Every application secured by the Keyrock generic enabler can define a set of permissions - i.e. a set of things that
can be done within the application. For example within the application, the ability to send a command to unlock a Smart
Door could be secured behind a Unlock Door permission. Similarly, the ability to send a command to ring the alarm bell
could be secured behind a Ring Bell permission, and the ability to alter prices could be secured behind a
Price Change permission
These permissions are grouped together in a series of roles - for example Unlock Door and Ring Bell could both be
assigned to the Security role, meaning that Users who are subsequently given that role would gain both permissions.
Permissions can overlap and be assigned to multiple roles - maybe Ring Bell is also assigned to the management role
along with Price Change and Order Stock.
In turn users or organizations will be assigned to one of more roles - each user will gain the sum of all the
permissions for each role they have. For example if Alice is assigned to both management and security roles, she will
gain all four permissions Unlock Door, Ring Bell, Price Change and Order Stock.
The concept of a role is unknown to a user - they only know the list of permissions they have been granted, not how the permissions are split up within the application.
In summary, permissions are all the possible actions that can be done to resources within an application, whereas roles are groups of actions which can be done by a type of user of that application.
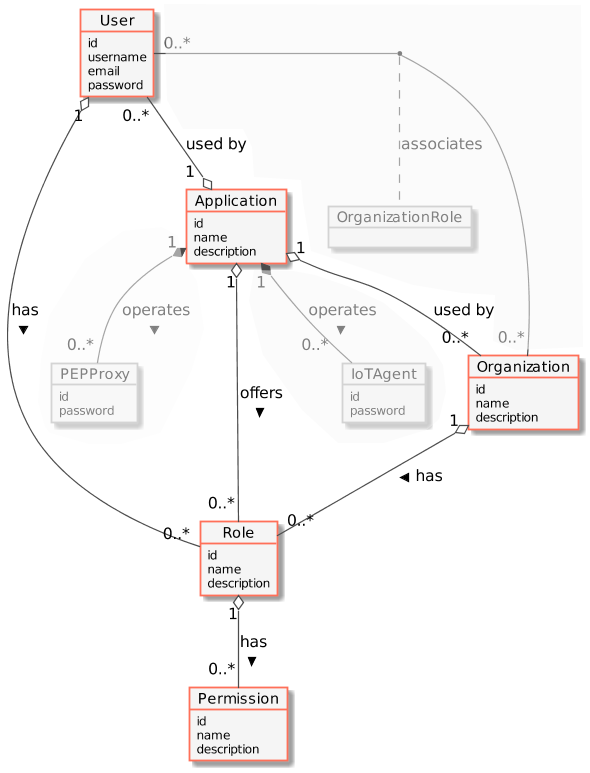
Standard Concepts of Identity Management
The following common objects are found with the Keyrock Identity Management database:
- User - Any signed-up user able to identify themselves with an eMail and password. Users can be assigned rights individually or as a group
- Application - Any securable FIWARE application consisting of a series of microservices
- Organization - A group of users who can be assigned a series of rights. Altering the rights of the organization effects the access of all users of that organization
- OrganizationRole - Users can either be members or admins of an organization - Admins are able to add and remove users from their organization, members merely gain the roles and permissions of an organization. This allows each organization to be responsible for their members and removes the need for a super-admin to administer all rights
- Role - A role is a descriptive bucket for a set of permissions. A role can be assigned to either a single user or an organization. A signed-in user gains all the permissions from all of their own roles plus all of the roles associated to their organization
- Permission - An ability to do something on a resource within the system
Additionally, two further non-human application objects can be secured within a FIWARE application:
- IoTAgent - a proxy between IoT Sensors and the Context Broker
- PEPProxy - a middleware for use between generic enablers challenging the rights of a user.
The relationship between the objects can be seen below - the entities marked in red are used directly within this tutorial:
Prerequisites
Docker
To keep things simple both components will be run using Docker. Docker is a container technology which allows to different components isolated into their respective environments.
- To install Docker on Windows follow the instructions here
- To install Docker on Mac follow the instructions here
- To install Docker on Linux follow the instructions here
Docker Compose is a tool for defining and running multi-container Docker applications. A YAML file is used configure the required services for the application. This means all container services can be brought up in a single command. Docker Compose is installed by default as part of Docker for Windows and Docker for Mac, however Linux users will need to follow the instructions found here
WSL
We will start up our services using a simple bash script. Windows users should download the Windows Subsystem for Linux to provide a command-line functionality similar to a Linux distribution on Windows.
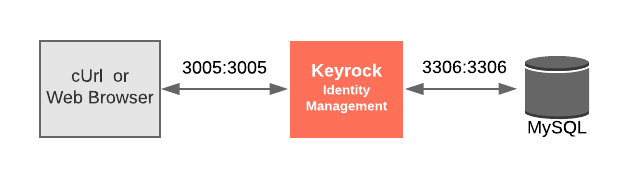
Architecture
This introduction will only make use of one FIWARE component - the Keyrock Identity Management Generic Enabler. Usage of Keyrock alone is insufficient for an application to qualify as “Powered by FIWARE”. Additionally, will be persisting user data in a MySQL database.
The overall architecture will consist of the following elements:
-
One FIWARE Generic Enabler:
- FIWARE Keyrock offer a complement Identity Management System
including:
- An authentication system for Applications and Users
- A site graphical frontend for Identity Management Administration
- An equivalent REST API for Identity Management via HTTP requests
- FIWARE Keyrock offer a complement Identity Management System
including:
-
One MySQL database :
- Used to persist user identities, applications, roles and permissions
Since all interactions between the elements are initiated by HTTP requests, the entities can be containerized and run from exposed ports.
The specific architecture of each section of the tutorial is discussed below.
Keyrock Configuration
keyrock:
    image: quay.io/fiware/idm
    container_name: fiware-keyrock
    hostname: keyrock
    depends_on:
        - mysql-db
    ports:
        - '3005:3005'
        - '${KEYROCK_HTTPS_PORT}:${KEYROCK_HTTPS_PORT}' # localhost:3443
    environment:
        - DEBUG=idm:*
        - DATABASE_HOST=mysql-db
        - IDM_DB_PASS_FILE=/run/secrets/my_secret_data
        - IDM_DB_USER=root
        - IDM_HOST=http://localhost:3005
        - IDM_PORT=3005
        - IDM_HTTPS_ENABLED=true
        - IDM_HTTPS_PORT=${KEYROCK_HTTPS_PORT}
        - IDM_ADMIN_USER=alice
        - IDM_ADMIN_EMAIL=alice-the-admin@test.com
        - IDM_ADMIN_PASS=test
    secrets:
        - my_secret_data
The keyrock container is a web application server listening on two ports:
- Port
3005has been exposed for HTTP traffic so we can display the web page and interact with the REST API. - Port
3443has been exposed for secure HTTPS traffic for the site and REST API
[!NOTE]
HTTPS should be used throughout for any secured application, but to do this properly, Keyrock requires a trusted SSL certificate - the default certificate is self-certified and available for testing purposes. The certificates can be overridden by attaching a volume to replace the files under
/opt/fiware-idm/certs.In a production environment, all access should occur over HTTPS, to avoid sending any sensitive information using plain-text. Alternatively HTTP can be used within a private network behind a configured HTTPS Reverse Proxy
The port
3005offering the HTTP protocol is being exposed for demonstration purposes only and to simplify the interactions within this tutorial - you may also use HTTPS on port3443with certain caveats.If you want to use HTTPS to access the REST API when you are using Postman, ensure that SSL certificate verfication is OFF. If you want to use HTTPS to access the web front-end, please accept any security warnings issued.
The keyrock container is driven by environment variables as shown:
| Key | Value | Description |
|---|---|---|
| IDM_DB_PASS | idm |
Password of the attached MySQL Database - secured by Docker Secrets (see below) |
| IDM_DB_USER | root |
Username of the default MySQL user - left in plain-text |
| IDM_HOST | http://localhost:3005 |
Hostname of the Keyrock App Server - used in activation eMails when signing up users |
| IDM_PORT | 3005 |
Port used by the Keyrock App Server for HTTP traffic - this has been altered from the default 3000 port to avoid clashes |
| IDM_HTTPS_ENABLED | true |
Whether to offer HTTPS Support - this will use the self-signed certs unless overridden |
| IDM_HTTPS_PORT | 3443 |
Port used by the Keyrock App Server for HTTP traffic this has been altered from the default 443 |
[!NOTE]
Note that this example has secured the MySQL password using Docker Secrets By using
IDM_DB_PASSwith the_FILEsuffix and referring to a secrets file location. This avoids exposing the password as anENVvariable in plain-text - either in theDockerfileImage or as an injected variable which could be read usingdocker inspect.The following list of variables (where used) should be set via secrets with the
_FILEsuffix in a Production System:
IDM_SESSION_SECRETIDM_ENCRYPTION_KEYIDM_DB_PASSIDM_DB_USERIDM_ADMIN_IDIDM_ADMIN_USERIDM_ADMIN_EMAILIDM_ADMIN_PASSIDM_EX_AUTH_DB_USERIDM_EX_AUTH_DB_PASS
MySQL Configuration
mysql-db:
    image: mysql:5.7
    hostname: mysql-db
    container_name: db-mysql
    expose:
        - '3306'
    ports:
        - '3306:3306'
    networks:
        - default
    environment:
        - 'MYSQL_ROOT_PASSWORD_FILE=/run/secrets/my_secret_data'
        - 'MYSQL_ROOT_HOST=172.18.1.5'
    volumes:
        - mysql-db:/var/lib/mysql
    secrets:
        - my_secret_data
The mysql-db container is listening on a single port:
- Port
3306is the default port for a MySQL server. It has been exposed so you can also run other database tools to display data if you wish
The mysql-db container is driven by environment variables as shown:
| Key | Value. | Description |
|---|---|---|
| MYSQL_ROOT_PASSWORD | 123 |
specifies a password that is set for the MySQL root account - secured by Docker Secrets (see below) |
| MYSQL_ROOT_HOST | root |
By default, MySQL creates the root'@'localhost account. This account can only be connected to from inside the container. Setting this environment variable allows root connections from other hosts |
Start Up
To start the installation, do the following:
git clone https://github.com/FIWARE/tutorials.Roles-Permissions.git
cd tutorials.Roles-Permissions
git checkout NGSI-v2

./services create
[!NOTE]
The initial creation of Docker images can take up to three minutes
Thereafter, all services can be initialized from the command-line by running the services Bash script provided within the repository:
./services <command>
Where <command> will vary depending upon the exercise we wish to activate.
[!NOTE]
If you want to clean up and start over again you can do so with the following command:
console
./services stop
Dramatis Personae
The following people at test.com legitimately have accounts within the Application
- Alice, she will be the Administrator of the Keyrock Application
- Bob, the Regional Manager of the supermarket chain - he has several store managers under him:
- Manager1
- Manager2
- Charlie, the Head of Security of the supermarket chain - he has several store detectives under him:
- Detective1
- Detective2
The following people at example.com have signed up for accounts, but have no reason to be granted access
- Eve - Eve the Eavesdropper
- Mallory - Mallory the malicious attacker
- Rob - Rob the Robber
For more details (Click to expand)
| Name | eMail | Password | UUID | | ---------- | --------------------------- | -------- | -------------------------------------- | | alice | `alice-the-admin@test.com` | `test` | `aaaaaaaa-good-0000-0000-000000000000` | | bob | `bob-the-manager@test.com` | `test` | `bbbbbbbb-good-0000-0000-000000000000` | | charlie | `charlie-security@test.com` | `test` | `cccccccc-good-0000-0000-000000000000` | | manager1 | `manager1@test.com` | `test` | `manager1-good-0000-0000-000000000000` | | manager2 | `manager2@test.com` | `test` | `manager2-good-0000-0000-000000000000` | | detective1 | `detective1@test.com` | `test` | `secure01-good-0000-0000-000000000000` | | detective2 | `detective2@test.com` | `test` | `secure02-good-0000-0000-000000000000` | | eve | `eve@example.com` | `test` | `eeeeeeee-evil-0000-0000-000000000000` | | mallory | `mallory@example.com` | `test` | `mmmmmmmm-evil-0000-0000-000000000000` | | rob | `rob@example.com` | `test` | `rrrrrrrr-evil-0000-0000-000000000000` |Two organizations have also been set up by Alice:
| Name | Description | UUID |
|---|---|---|
| Security | Security Group for Store Detectives | security-team-0000-0000-000000000000 |
| Management | Management Group for Store Managers | managers-team-0000-0000-000000000000 |
To save time, the data creating users and organizations from the previous tutorial has been downloaded and is automatically persisted to the MySQL database on start-up, so the assigned UUIDs do not change, and the data does not need to be entered again
To refresh your memory about how to create users and organizations, you can log in at http://localhost:3005/idm using
the account alice-the-admin@test.com with a password of test.
and look at the organizations list.
Reading directly from the Keyrock MySQL Database
All Identify Management records and relationships are held within the attached MySQL database. This can be accessed by entering the running Docker container as shown:
docker exec -it db-mysql bash
mysql -u <user> -p<password> idm
Where <user> and <password> match the values defined in the docker-compose file for MYSQL_ROOT_PASSWORD and
MYSQL_ROOT_USER. The default values for the tutorial are usually root and secret.
SQL commands can then be entered from the command-line. e.g.:
select id, username, email, password from user;
The Keyrock MySQL database deals with all aspects of application security including storing users, password etc; defining access rights and dealing with OAuth2 authorization protocols. The complete database relationship diagram can be found here
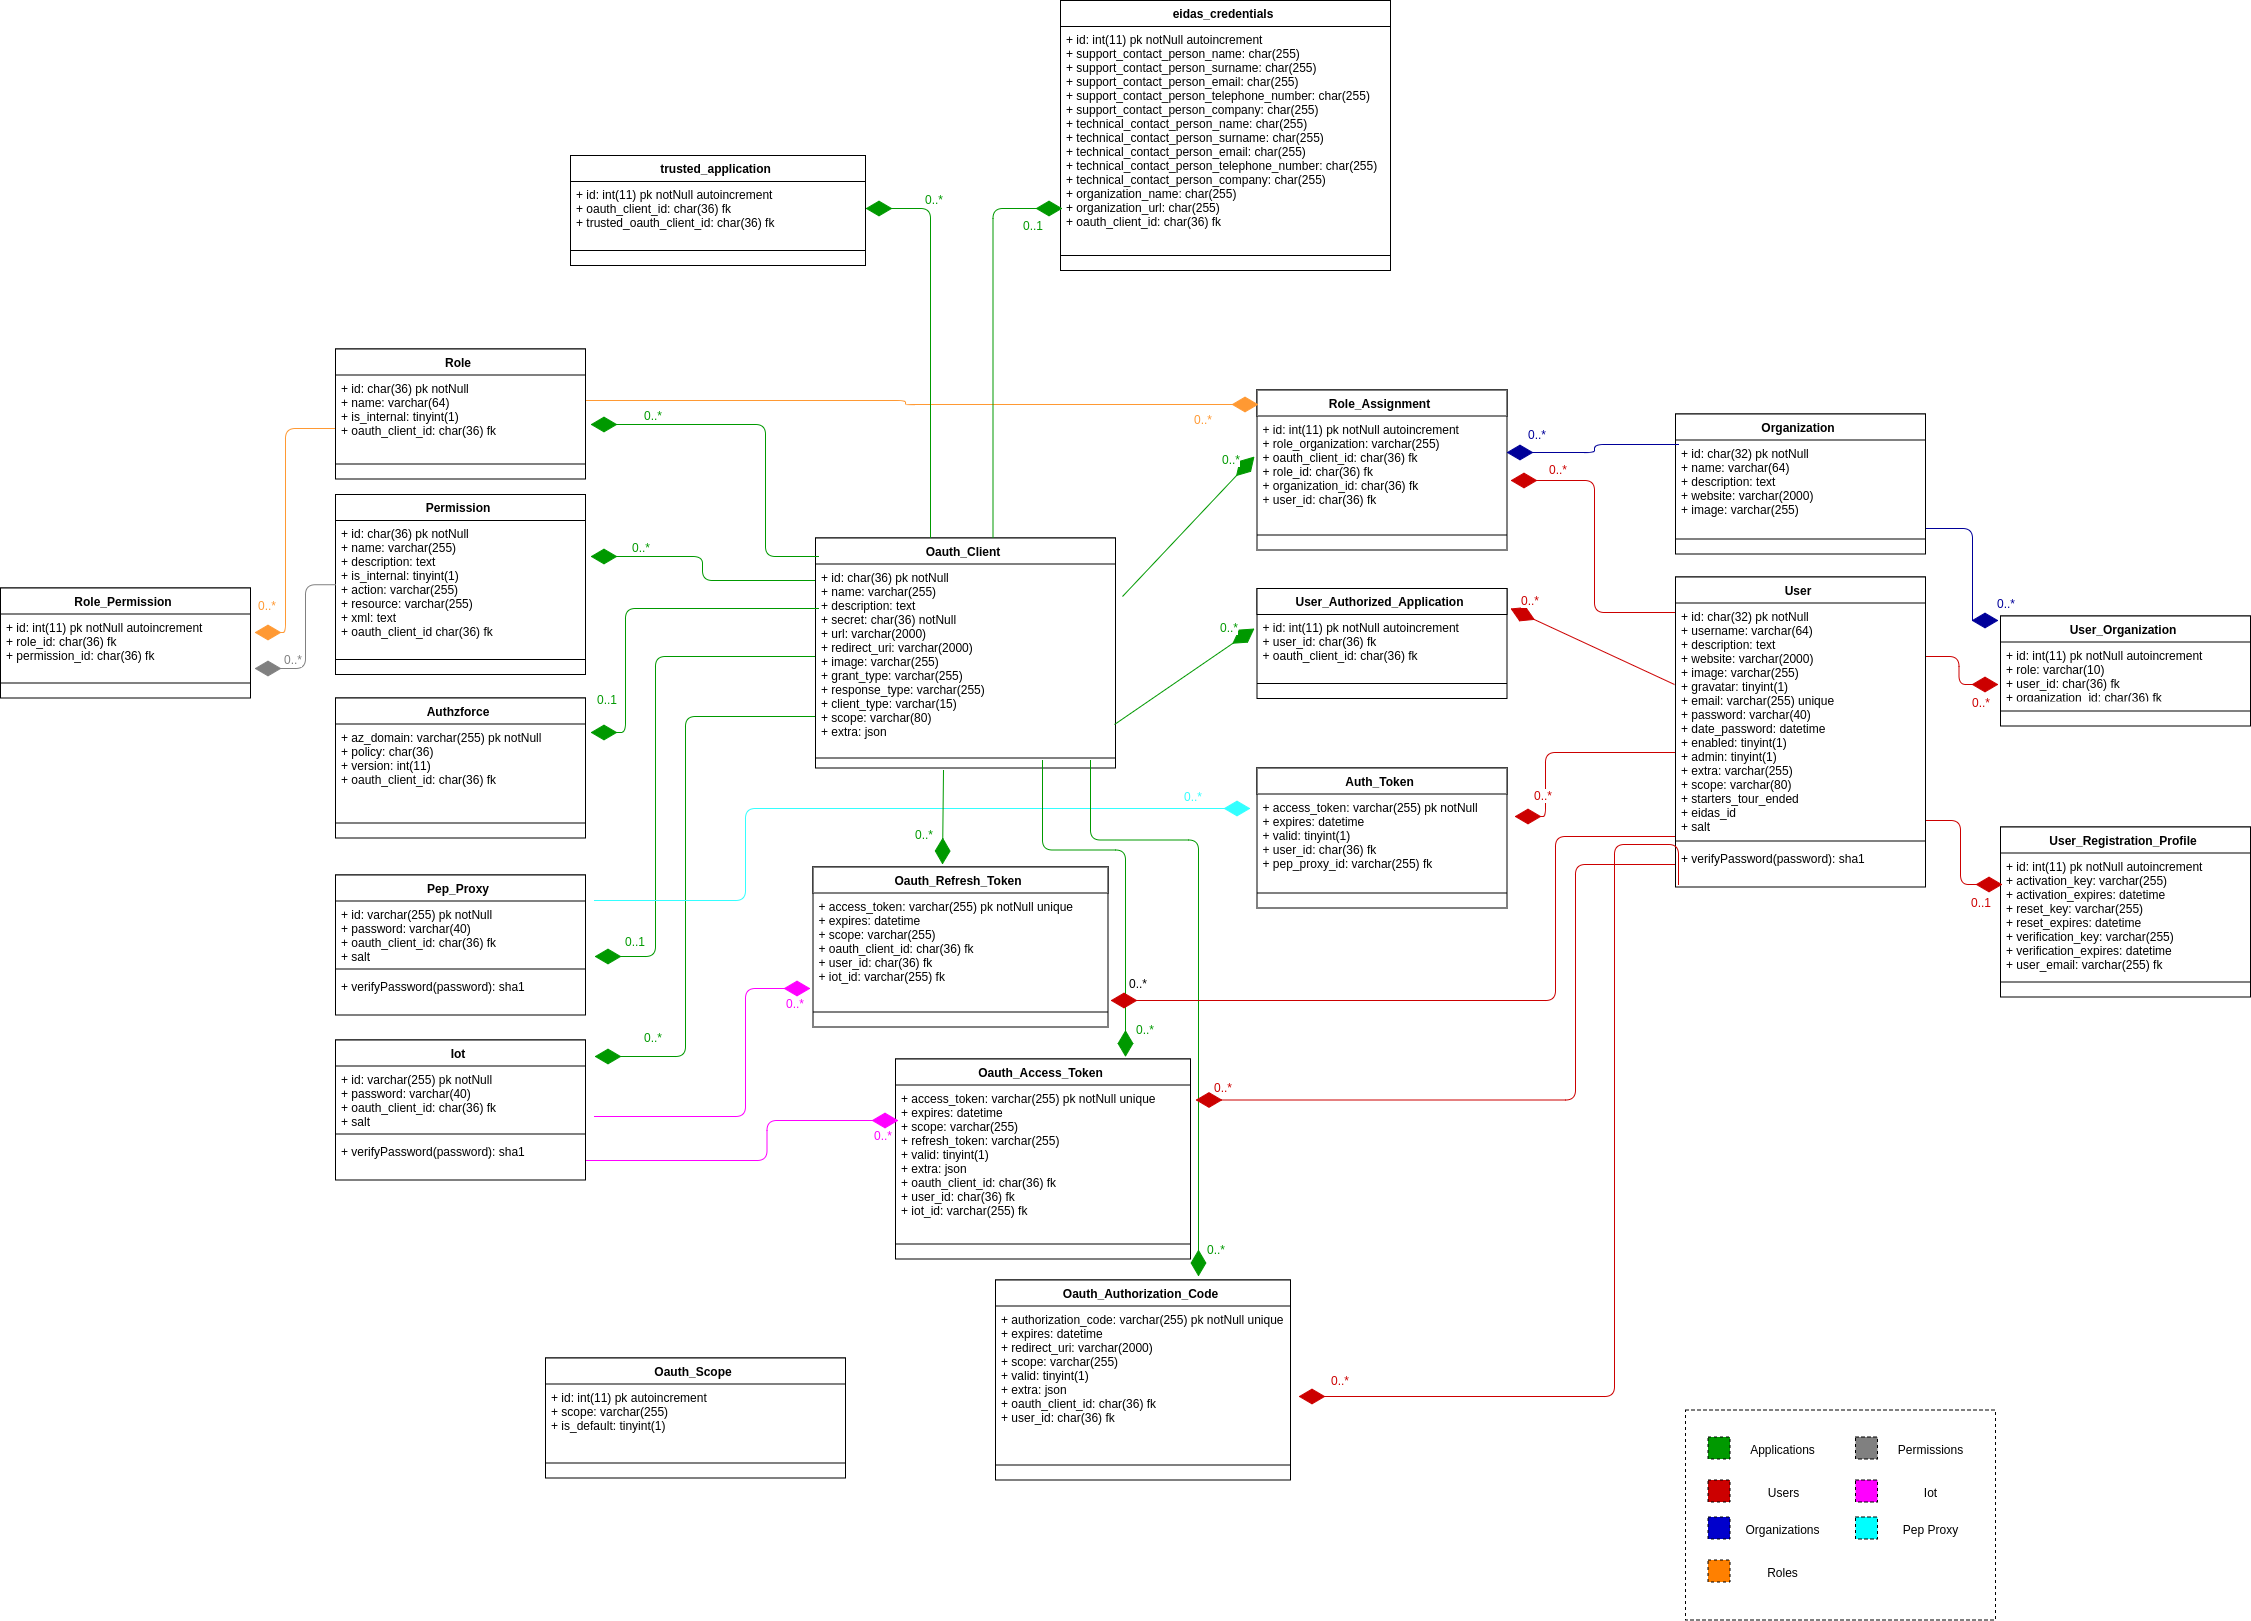
UUIDs within Keyrock
All IDs and tokens within Keyrock are subject to change. The following values will need to be amended when querying for records. Record IDs use Universally Unique Identifiers - UUIDs.
| Key | Description | Sample Value |
|---|---|---|
keyrock |
URL for the location of the Keyrock service | localhost:3005 for HTTP, localhost:3443 for HTTPS |
X-Auth-token |
Token received in the Header when logging in as a user | aaaaaaaa-aaaa-aaaa-aaaa-aaaaaaaaaaaa = I am Alice |
X-Subject-token |
Token to pass when asking about a subject, alternatively repeat the user token | bbbbbbbb-bbbb-bbbb-bbbb-bbbbbbbbbbbb = Asking about Bob |
user-id |
ID of an existing user, found with the user table |
bbbbbbbb-good-0000-0000-000000000000 - Bob's User ID |
application-id |
ID of an existing application, found with the oauth_client table |
c978218d-ad63-4427-b12b-542b81299cfb |
role-id |
ID of an existing role, found with the role table |
d28baa00-839e-4b45-a6b2-1cec563942ee |
permission-id |
ID of an existing permission, found with the permission table |
6b6cd19c-9398-4834-9ba1-1616c57139c0 |
organization-id |
ID of an existing organization, found with the organization table |
e424ed98-c966-46e3-b161-a165fd31bc01 |
organization-role-id |
type of role a user has within an organization either owner or member |
member |
iot-agent-id |
ID of an existing IoT Agent, found with the iot table |
iot_sensor_f3d0245b-3330-4e64-a513-81bf4b0dae64 |
pep-proxy-id |
ID of an existing PEP Proxy, found with the pep_proxy table |
iot_sensor_f3d0245b-3330-4e64-a513-81bf4b0dae64 |
Tokens are designed to expire after a set period. If the X-Auth-token value you are using has expired, log-in again to
obtain a new token. For this tutorial, a long-lasting set of tokens has been created for each user and persisted into
the database, so there is usually no need to refresh tokens.
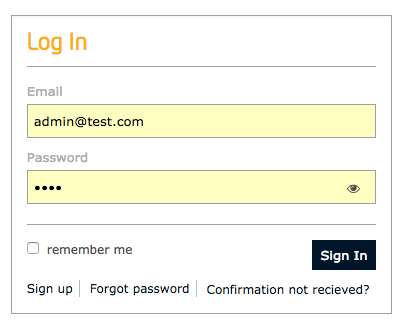
Logging In via REST API calls
Enter a username and password to enter the application. The default super-user has the values alice-the-admin@test.com
and test. The URL https://localhost:3443/v1/auth/tokens should also work in a secure system.
Create Token with Password
The following example logs in using the Admin Super-User:
1️⃣ Request:
curl -iX POST \
  'http://localhost:3005/v1/auth/tokens' \
  -H 'Content-Type: application/json' \
  -d '{
  "name": "alice-the-admin@test.com",
  "password": "test"
}'
Response:
HTTP/1.1 201 Created
X-Subject-Token: d848eb12-889f-433b-9811-6a4fbf0b86ca
Content-Type: application/json; charset=utf-8
Content-Length: 138
ETag: W/"8a-TVwlWNKBsa7cskJw55uE/wZl6L8"
Date: Mon, 30 Jul 2018 12:07:54 GMT
Connection: keep-alive
{
    "token": {
        "methods": ["password"],
        "expires_at": "2018-07-30T13:02:37.116Z"
    },
    "idm_authorization_config": {
        "level": "basic",
        "authzforce": false
    }
}
Get Token Info
You can use the long-lasting X-Auth-token=aaaaaaaa-aaaa-aaaa-aaaa-aaaaaaaaaaaa to pretend to be Alice throughout this
tutorial.
The presence of a (time-limited) token is sufficient to find out more information about the user. To find information
about Bob, use the long-lasting token X-Subject-token=bbbbbbbb-bbbb-bbbb-bbbb-bbbbbbbbbbbb.
This request indicates that the user authorized with the token {{X-Auth-token}} (i.e. Alice) is enquiring about the
user holding the token {{X-Subject-token}} (i.e. Bob).
2️⃣ Request:
curl -iX GET \
  'http://localhost:3005/v1/auth/tokens' \
  -H 'Content-Type: application/json' \
  -H 'X-Auth-token: aaaaaaaa-aaaa-aaaa-aaaa-aaaaaaaaaaaa' \
  -H 'X-Subject-token: bbbbbbbb-bbbb-bbbb-bbbb-bbbbbbbbbbbb'
Response:
The response will return the details of the associated user. As you can see Bob holds a long-lasting token until 2026.
{
    "access_token": "bbbbbbbb-bbbb-bbbb-bbbb-bbbbbbbbbbbb",
    "expires": "2026-07-30T12:38:13.000Z",
    "valid": true,
    "User": {
        "scope": [],
        "id": "bbbbbbbb-good-0000-0000-000000000000",
        "username": "bob",
        "email": "bob-the-manager@test.com",
        "date_password": "2018-07-30T11:41:14.000Z",
        "enabled": true,
        "admin": false
    }
}
Managing Applications
Any FIWARE application can be broken down into a collection of microservices. These microservices connect together to read and alter the state of the real world. Security can be added to these services by restricting actions on these resources down to users how have appropriate permissions. It is therefore necessary to define an application to offer a set of permissible actions and to hold a list of permitted users (or groups of users i.e. an Organization)
Applications are therefore a conceptual bucket holding who can do what on which resource.
Video : Creating Applications with the Keyrock GUI
![]()
Click on the image above to watch a video demonstrating how to create applications using the Keyrock GUI
Application CRUD Actions
The standard CRUD actions are assigned to the appropriate HTTP verbs (POST, GET, PATCH and DELETE) under the
/v1/applications endpoint.
Create an Application
Once logged in, a user is presented with a home-screen
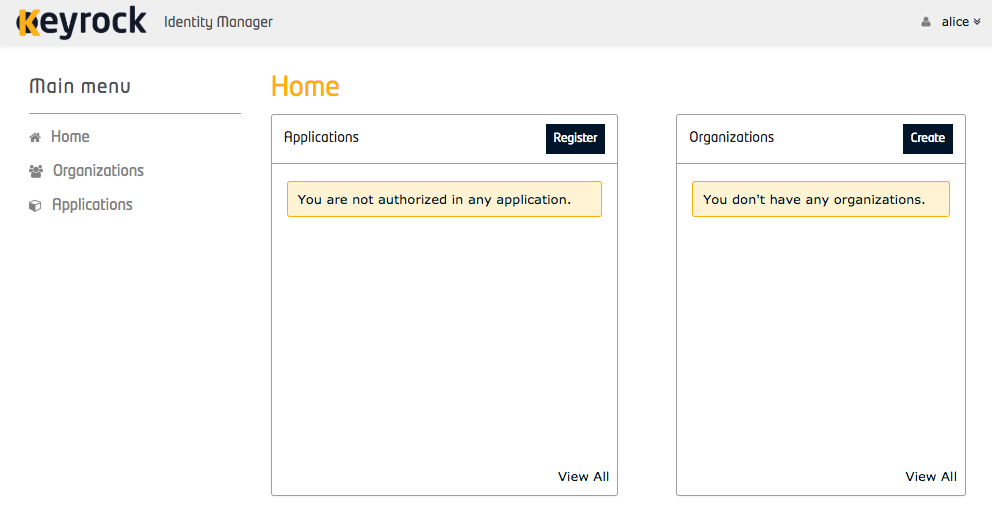
From the homepage of the GUI, a new application can be created by clicking the Register button.
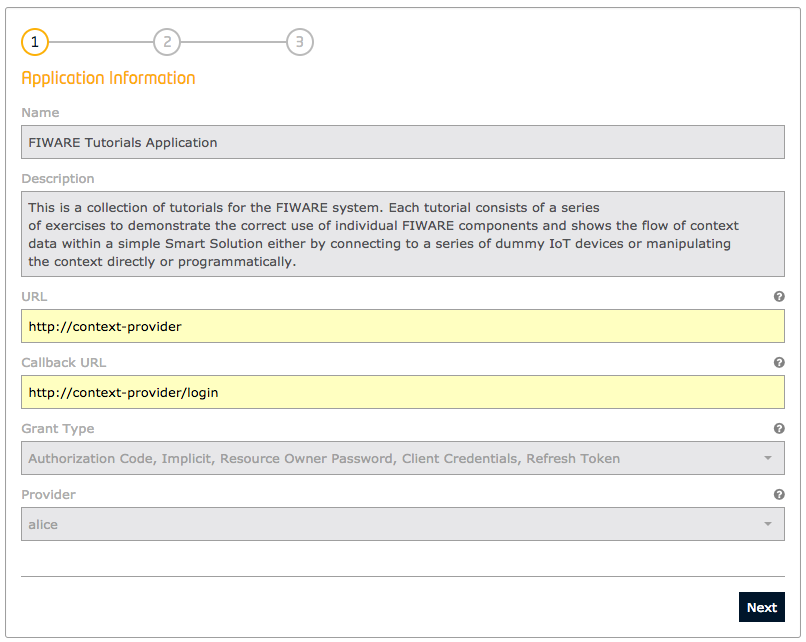
To create a new application via the REST API, send a POST request to the /v1/applications endpoint containing details
of the application such as name and description, along with OAuth information fields such as the url of the
webservice to be protected, and redirect_uri (where a user will be challenged for their credentials). The
grant_types are chosen from the available list of OAuth2 grant flows which are discussed in a
subsequent tutorial The headers include the X-Auth-token from a previously logged-in user will
automatically be granted a provider role over the application.
3️⃣ Request:
In the example below, Alice (who holds X-Auth-token=aaaaaaaa-aaaa-aaaa-aaaa-aaaaaaaaaaaa) is creating a new
application which accepts three different grant types
curl -iX POST \
  'http://localhost:3005/v1/applications' \
  -H 'Content-Type: application/json' \
  -H 'X-Auth-token: aaaaaaaa-aaaa-aaaa-aaaa-aaaaaaaaaaaa' \
  -d '{
  "application": {
    "name": "Tutorial Application",
    "description": "FIWARE Application protected by OAuth2 and Keyrock",
    "redirect_uri": "http://tutorial/login",
    "url": "http://tutorial",
    "grant_type": [
      "authorization_code",
      "implicit",
      "password"
    ],
    "token_types": ["permanent"]
  }
}'
Response:
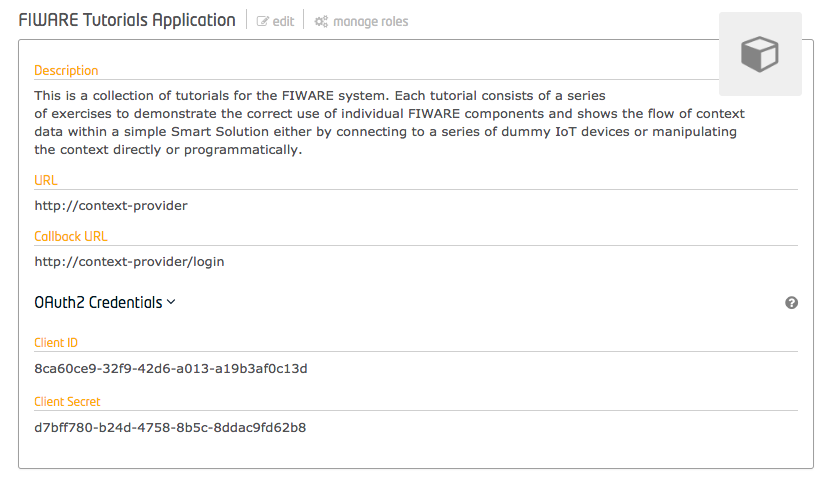
The response includes a Client ID and Secret which can be used to secure the application.
{
    "application": {
        "id": "6632bb2e-c8e5-418f-ba5b-c269d8a53dd2",
        "secret": "d4128d06-1cba-4c33-9a3d-ff2de51940b5",
        "image": "default",
        "jwt_secret": null,
        "name": "Tutorial Application",
        "description": "FIWARE Application protected by OAuth2 and Keyrock",
        "redirect_uri": "http://tutorial/login",
        "url": "http://tutorial",
        "grant_type": "password,authorization_code,implicit",
        "token_types": "permanent,bearer",
        "response_type": "code,token",
        "scope": null
    }
}
Copy the Application Client ID to be used for all other application requests - in the case above the ID is
6632bb2e-c8e5-418f-ba5b-c269d8a53dd2.
Read Application Details
Making a GET request to a resource under the /v1/applications/{{application-id}} endpoint will return the application
listed under that ID. The X-Auth-token must be supplied in the headers.
4️⃣ Request:
curl -X GET \
  'http://localhost:3005/v1/applications/{{application-id}}' \
  -H 'Content-Type: application/json' \
  -H 'X-Auth-token: {{X-Auth-token}}'
Response:
{
    "application": {
        "id": "6632bb2e-c8e5-418f-ba5b-c269d8a53dd2",
        "name": "Tutorial Application",
        "description": "FIWARE Application protected by OAuth2 and Keyrock",
        "secret": "d4128d06-1cba-4c33-9a3d-ff2de51940b5",
        "url": "http://tutorial",
        "redirect_uri": "http://tutorial/login",
        "redirect_sign_out_uri": null,
        "image": "default",
        "grant_type": "password,authorization_code,implicit",
        "response_type": "code,token",
        "token_types": "permanent,bearer",
        "jwt_secret": null,
        "client_type": null,
        "scope": null,
        "extra": null,
        "urls": {
            "permissions_url": "/v1/applications/6632bb2e-c8e5-418f-ba5b-c269d8a53dd2/permissions",
            "roles_url": "/v1/applications/6632bb2e-c8e5-418f-ba5b-c269d8a53dd2/roles",
            "users_url": "/v1/applications/6632bb2e-c8e5-418f-ba5b-c269d8a53dd2/users",
            "pep_proxies_url": "/v1/applications/6632bb2e-c8e5-418f-ba5b-c269d8a53dd2/pep_proxies",
            "iot_agents_url": "/v1/applications/6632bb2e-c8e5-418f-ba5b-c269d8a53dd2/iot_agents",
            "trusted_applications_url": "/v1/applications/6632bb2e-c8e5-418f-ba5b-c269d8a53dd2/trusted_applications"
        }
    }
}
List all Applications
Users will only be permitted to return applications they are associated with. Listing applications can be done by making
a GET request to the /v1/applications endpoint and supplying the X-Auth-token Header.
5️⃣ Request:
curl -X GET \
  'http://localhost:3005/v1/applications' \
  -H 'Content-Type: application/json' \
  -H 'X-Auth-token: {{X-Auth-token}}'
Response:
{
    "applications": [
        {
            "id": "6632bb2e-c8e5-418f-ba5b-c269d8a53dd2",
            "name": "Tutorial Application",
            "description": "FIWARE Application protected by OAuth2 and Keyrock",
            "image": "default",
            "url": "http://tutorial",
            "redirect_uri": "http://tutorial/login",
            "redirect_sign_out_uri": null,
            "grant_type": "password,authorization_code,implicit",
            "response_type": "code,token",
            "token_types": "permanent,bearer",
            "jwt_secret": null,
            "client_type": null,
            "urls": {
                "permissions_url": "/v1/applications/6632bb2e-c8e5-418f-ba5b-c269d8a53dd2/permissions",
                "roles_url": "/v1/applications/6632bb2e-c8e5-418f-ba5b-c269d8a53dd2/roles",
                "users_url": "/v1/applications/6632bb2e-c8e5-418f-ba5b-c269d8a53dd2/users",
                "pep_proxies_url": "/v1/applications/6632bb2e-c8e5-418f-ba5b-c269d8a53dd2/pep_proxies",
                "iot_agents_url": "/v1/applications/6632bb2e-c8e5-418f-ba5b-c269d8a53dd2/iot_agents",
                "trusted_applications_url": "/v1/applications/6632bb2e-c8e5-418f-ba5b-c269d8a53dd2/trusted_applications"
            }
        }
    ]
}
Update an Application
Within the GUI, users can be updated by selecting an application and clicking on edit. This can also be done from the
command-line by making PATCH request to /v1/applications/{{applications-id}} endpoint when the applications ID is
known. The X-Auth-token header must also be set, since a User can only edit applications he is associated with.
6️⃣ Request:
curl -X PATCH \
  'http://localhost:3005/v1/applications/{{application-id}}' \
  -H 'Content-Type: application/json' \
  -H 'X-Auth-token: {{X-Auth-token}}' \
  -d '{
  "application": {
    "name": "Tutorial New Name",
    "description": "This is a new description",
    "redirect_uri": "http://tutorial/login",
    "grant_type": [
      "authorization_code",
      "password"
    ]
  }
}'
Response:
The response lists the fields which have been updated, note that the redirect_uri defined above had already been set:
{
    "values_updated": {
        "name": "Tutorial New Name",
        "description": "This is a new description",
        "grant_type": "password,authorization_code",
        "response_type": "code",
        "token_types": "permanent,bearer,bearer",
        "scope": ""
    }
}
Delete an Application
Within the GUI, users can delete an application by selecting an application and clicking on edit, then scrolling to
the bottom of the page and selecting Remove Application. This can also be done from the command-line by sending a
DELETE request to the /v1/applications/{{applications-id}} endpoint. The X-Auth-token header must also be set.
7️⃣ Request:
curl -iX DELETE \
  'http://localhost:3005/v1/applications/{{applications-id}}' \
  -H 'Content-Type: application/json' \
  -H 'X-Auth-token: {{X-Auth-token}}'
Permission CRUD Actions
An application permission is an allowable action on a resource within that application. Each resource is defined by a
URL (e.g. /price-change) and the action is any HTTP verb (e.g. GET):
- The combination will be used to ensure only permitted users are able to access the
/price-changeresource.
Further advanced permission rules can be described using XACML - this is the subject of another tutorial.
It should be emphasized that permissions are always found bound to an application - abstract permissions do not exist on
their own. The standard permission CRUD actions are assigned to the appropriate HTTP verbs (POST, GET, PATCH and DELETE)
under the /v1/applications/{{application-id}}/permissions endpoint:
- As you can see the
<application-id>itself is integral to the URL.
Permissions are usually defined once and set-up when the application is created. If the design of your use-case means that you find you need to alter the permissions regularly, then the definition has probably been defined incorrectly or in the wrong layer - complex access control rules should be pushed down into the XACML definitions or moved into the business logic of the application - they should not be dealt with within Keyrock.
Create a Permission
Within the GUI, a permission can be added to an application by selecting the application, clicking on Manage Roles and then clicking on the Add Permission button.
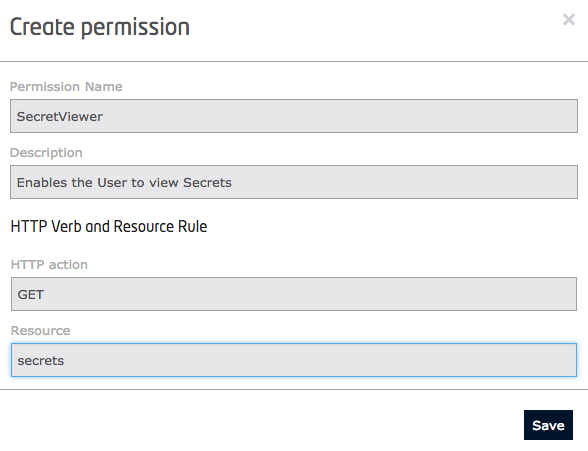
To create a new permission via the REST API, send a POST request to the
/v1/applications/{{application-id}}/permissions endpoint containing details of the permission such as name,
description, action (the HTTP verb) and resource (the URL).
8️⃣ Request:
In the example below, Alice is creating a new permission allowing a user to change prices.
curl -iX POST \
  'http://localhost:3005/v1/applications/{{application-id}}/permissions' \
  -H 'Content-Type: application/json' \
  -H 'X-Auth-token: {{X-Auth-token}}' \
  -d '{
  "permission": {
    "name": "Price Change",
    "description": "Allow a user to change prices",
    "action": "PATCH",
    "resource": "/price-change"
  }
}'
Response:
The response returns details of the permission, including a permission-id which is needed for subsequent operations.
{
    "permission": {
        "id": "6b6cd19c-9398-4834-9ba1-1616c57139c0",
        "name": "Price Change",
        "description": "Allow a user to change prices",
        "action": "PATCH",
        "resource": "/price-change",
        "xml": null
    }
}
Additional permissions can be added by making repeated POST requests.
For example, to create additional permissions for locking doors and ringing an alarm bell.
curl -iX POST \
  'http://localhost:3005/v1/applications/{{application-id}}/permissions' \
  -H 'Content-Type: application/json' \
  -H 'X-Auth-token: {{X-Auth-token}}' \
  -d '{
  "permission": {
    "name": "Unlock Door",
    "description": "Allow a user to unlock a smart door",
    "action": "PATCH",
    "resource": "/unlock-door"
  }
}'
curl -iX POST \
  'http://localhost:3005/v1/applications/{{application-id}}/permissions' \
  -H 'Content-Type: application/json' \
  -H 'X-Auth-token: {{X-Auth-token}}' \
  -d '{
  "permission": {
    "name": "Ring Bell",
    "description": "Allow a user to ring an alarm bell",
    "action": "PATCH",
    "resource": "/ring-bell"
  }
}'
Read Permission Details
Making a GET request to a resource under the /v1/applications/{{application-id}}/permissions/{{permission-id}}
endpoint will return the permission listed under that ID. The X-Auth-token must be supplied in the headers.
9️⃣ Request:
curl -X GET \
  'http://localhost:3005/v1/applications/{{application-id}}/permissions/{{permission-id}}' \
  -H 'Content-Type: application/json' \
  -H 'X-Auth-token: {{X-Auth-token}}'
Response:
{
    "permission": {
        "id": "6b6cd19c-9398-4834-9ba1-1616c57139c0",
        "name": "Price Change",
        "description": "Allow a user to change prices",
        "action": "PATCH",
        "resource": "/price-change",
        "xml": null
    }
}
List Permissions
Listing permissions can be done by making a GET request to the /v1/applications/{{application-id}}/permissions
endpoint and supplying the X-Auth-token header.
1️⃣0️⃣ Request:
curl -X GET \
  'http://localhost:3005/v1/applications/{{application-id}}/permissions' \
  -H 'Content-Type: application/json' \
  -H 'X-Auth-token: {{X-Auth-token}}'
Response:
The response includes all permissions for the application, including several default permissions created by Keyrock.
{
    "permissions": [
        {
            "id": "1",
            "name": "Get and assign all public application roles",
            "description": "Get and assign all public application roles",
            "action": "GET",
            "resource": "public",
            "xml": null
        },
        {
            "id": "2",
            "name": "Get and delete only public application roles",
            "description": "Get and delete only public application roles",
            "action": "DELETE",
            "resource": "public",
            "xml": null
        },
        ...
        {
            "id": "6b6cd19c-9398-4834-9ba1-1616c57139c0",
            "name": "Price Change",
            "description": "Allow a user to change prices",
            "action": "PATCH",
            "resource": "/price-change",
            "xml": null
        },
        {
            "id": "7c7de20d-a4a9-5945-ab22-2727d68240d1",
            "name": "Unlock Door",
            "description": "Allow a user to unlock a smart door",
            "action": "PATCH",
            "resource": "/unlock-door",
            "xml": null
        },
        {
            "id": "8d8ef31e-b5b0-6a56-bc33-3838e79351e2",
            "name": "Ring Bell",
            "description": "Allow a user to ring an alarm bell",
            "action": "PATCH",
            "resource": "/ring-bell",
            "xml": null
        }
    ]
}
Update a Permission
Making a PATCH request to the /v1/applications/{{application-id}}/permissions/{{permission-id}} endpoint will update
the permission.
1️⃣1️⃣ Request:
curl -iX PATCH \
  'http://localhost:3005/v1/applications/{{application-id}}/permissions/{{permission-id}}' \
  -H 'Content-Type: application/json' \
  -H 'X-Auth-token: {{X-Auth-token}}' \
  -d '{
  "permission": {
    "name": "Price Change",
    "description": "Allow a manager to change prices",
    "action": "PATCH",
    "resource": "/price-change"
  }
}'
Response:
{
    "values_updated": {
        "description": "Allow a manager to change prices"
    }
}
Delete a Permission
A permission can be deleted by sending a DELETE request to the
/v1/applications/{{application-id}}/permissions/{{permission-id}} endpoint.
1️⃣2️⃣ Request:
curl -iX DELETE \
  'http://localhost:3005/v1/applications/{{application-id}}/permissions/{{permission-id}}' \
  -H 'Content-Type: application/json' \
  -H 'X-Auth-token: {{X-Auth-token}}'
Role CRUD Actions
A role is a conceptual bucket of permissions used to define a type of user.
Standard role CRUD actions are assigned to the appropriate HTTP verbs (POST, GET, PATCH and DELETE) under the
/v1/applications/{{application-id}}/roles endpoint.
Create a Role
Within the GUI, a role can be added to an application by selecting the application, clicking on Manage Roles and then clicking on the Add Role button.
To create a new role via the REST API, send a POST request to the /v1/applications/{{application-id}}/roles endpoint
containing the name of the role.
1️⃣3️⃣ Request:
In the example below, Alice is creating a new Security role.
curl -iX POST \
  'http://localhost:3005/v1/applications/{{application-id}}/roles' \
  -H 'Content-Type: application/json' \
  -H 'X-Auth-token: {{X-Auth-token}}' \
  -d '{
  "role": {
    "name": "Security"
  }
}'
Response:
The response returns details of the role, including a role-id which is needed for subsequent operations.
{
    "role": {
        "id": "d28baa00-839e-4b45-a6b2-1cec563942ee",
        "name": "Security",
        "application_id": "6632bb2e-c8e5-418f-ba5b-c269d8a53dd2"
    }
}
Additional roles can be added by making repeated POST requests.
For example, to create an additional role for Management.
curl -iX POST \
  'http://localhost:3005/v1/applications/{{application-id}}/roles' \
  -H 'Content-Type: application/json' \
  -H 'X-Auth-token: {{X-Auth-token}}' \
  -d '{
  "role": {
    "name": "Management"
  }
}'
Read Role Details
Making a GET request to a resource under the /v1/applications/{{application-id}}/roles/{{role-id}} endpoint will
return the role listed under that ID. The X-Auth-token must be supplied in the headers.
1️⃣4️⃣ Request:
curl -X GET \
  'http://localhost:3005/v1/applications/{{application-id}}/roles/{{role-id}}' \
  -H 'Content-Type: application/json' \
  -H 'X-Auth-token: {{X-Auth-token}}'
Response:
{
    "role": {
        "id": "d28baa00-839e-4b45-a6b2-1cec563942ee",
        "name": "Security",
        "application_id": "6632bb2e-c8e5-418f-ba5b-c269d8a53dd2"
    }
}
List Roles
Listing roles can be done by making a GET request to the /v1/applications/{{application-id}}/roles endpoint and
supplying the X-Auth-token header.
1️⃣5️⃣ Request:
curl -X GET \
  'http://localhost:3005/v1/applications/{{application-id}}/roles' \
  -H 'Content-Type: application/json' \
  -H 'X-Auth-token: {{X-Auth-token}}'
Response:
The response includes all roles for the application, including several default roles created by Keyrock.
{
    "roles": [
        {
            "id": "provider",
            "name": "Provider"
        },
        {
            "id": "purchaser",
            "name": "Purchaser"
        },
        {
            "id": "d28baa00-839e-4b45-a6b2-1cec563942ee",
            "name": "Security"
        },
        {
            "id": "e39cbb11-94af-5c56-b7c3-2d2d674a53ff",
            "name": "Management"
        }
    ]
}
Update a Role
Making a PATCH request to the /v1/applications/{{application-id}}/roles/{{role-id}} endpoint will update the role.
1️⃣6️⃣ Request:
curl -iX PATCH \
  'http://localhost:3005/v1/applications/{{application-id}}/roles/{{role-id}}' \
  -H 'Content-Type: application/json' \
  -H 'X-Auth-token: {{X-Auth-token}}' \
  -d '{
  "role": {
    "name": "Store Security"
  }
}'
Response:
{
    "values_updated": {
        "name": "Store Security"
    }
}
Delete a Role
A role can be deleted by sending a DELETE request to the /v1/applications/{{application-id}}/roles/{{role-id}}
endpoint.
1️⃣7️⃣ Request:
curl -iX DELETE \
  'http://localhost:3005/v1/applications/{{application-id}}/roles/{{role-id}}' \
  -H 'Content-Type: application/json' \
  -H 'X-Auth-token: {{X-Auth-token}}'
Assigning Permissions to each Role
Once the set of roles and permissions has been defined, it is necessary to group them together. This is done by assigning one or more permissions to each role.
Add a Permission to a Role
To assign a permission to a role using the GUI, select the application, and click on Manage Roles. On the next screen, permissions can be dragged and dropped into the appropriate role.

Alternatively, via the REST API, send a PUT request to the
/v1/applications/{{application-id}}/roles/{{role-id}}/permissions/{{permission-id}} endpoint.
1️⃣8️⃣ Request:
In the example below, Alice is assigning the Ring Bell permission to the Security role.
curl -iX PUT \
  'http://localhost:3005/v1/applications/{{application-id}}/roles/{{role-id}}/permissions/{{permission-id}}' \
  -H 'Content-Type: application/json' \
  -H 'X-Auth-token: {{X-Auth-token}}'
Response:
The response confirms the assignment.
{
    "role_permission_assignments": {
        "role_id": "d28baa00-839e-4b45-a6b2-1cec563942ee",
        "permission_id": "8d8ef31e-b5b0-6a56-bc33-3838e79351e2"
    }
}
Repeat this process to assign all necessary permissions to each role.
List Permissions of a Role
Listing permissions of a role can be done by making a GET request to the
/v1/applications/{{application-id}}/roles/{{role-id}}/permissions endpoint.
1️⃣9️⃣ Request:
curl -X GET \
  'http://localhost:3005/v1/applications/{{application-id}}/roles/{{role-id}}/permissions' \
  -H 'Content-Type: application/json' \
  -H 'X-Auth-token: {{X-Auth-token}}'
Response:
{
    "role_permissions": [
        {
            "id": "8d8ef31e-b5b0-6a56-bc33-3838e79351e2",
            "name": "Ring Bell",
            "description": "Allow a user to ring an alarm bell",
            "action": "PATCH",
            "resource": "/ring-bell",
            "xml": null
        },
        {
            "id": "7c7de20d-a4a9-5945-ab22-2727d68240d1",
            "name": "Unlock Door",
            "description": "Allow a user to unlock a smart door",
            "action": "PATCH",
            "resource": "/unlock-door",
            "xml": null
        }
    ]
}
Remove a Permission from a Role
To remove a permission from a role, send a DELETE request to the
/v1/applications/{{application-id}}/roles/{{role-id}}/permissions/{{permission-id}} endpoint.
2️⃣0️⃣ Request:
curl -iX DELETE \
  'http://localhost:3005/v1/applications/{{application-id}}/roles/{{role-id}}/permissions/{{permission-id}}' \
  -H 'Content-Type: application/json' \
  -H 'X-Auth-token: {{X-Auth-token}}'
Authorizing Application Access
Once an application is created and its roles and permissions are defined, it is necessary to specify which users or organizations are authorized to use it. Access is granted by assigning a role to a user or organization.
Authorizing Organizations
Granting a role to an organization means that all current and future members of that organization gain the associated permissions automatically.
Grant a Role to an Organization
To grant a role to an organization using the GUI, select the application, click on Authorize and then select the organization and role.

Alternatively, via the REST API, send a PUT request to the
/v1/applications/{{application-id}}/organizations/{{organization-id}}/roles/{{role-id}} endpoint.
2️⃣1️⃣ Request:
In the example below, Alice is granting the Security role to the Security organization.
curl -iX PUT \
  'http://localhost:3005/v1/applications/{{application-id}}/organizations/{{organization-id}}/roles/{{role-id}}' \
  -H 'Content-Type: application/json' \
  -H 'X-Auth-token: {{X-Auth-token}}'
Response:
{
    "organization_role_assignments": {
        "application_id": "6632bb2e-c8e5-418f-ba5b-c269d8a53dd2",
        "role_id": "d28baa00-839e-4b45-a6b2-1cec563942ee",
        "organization_id": "security-team-0000-0000-000000000000"
    }
}
List Granted Organization Roles
Listing roles granted to an organization can be done by making a GET request to the
/v1/applications/{{application-id}}/organizations/{{organization-id}}/roles endpoint.
2️⃣2️⃣ Request:
curl -X GET \
  'http://localhost:3005/v1/applications/{{application-id}}/organizations/{{organization-id}}/roles' \
  -H 'Content-Type: application/json' \
  -H 'X-Auth-token: {{X-Auth-token}}'
Response:
{
    "organization_roles": [
        {
            "id": "d28baa00-839e-4b45-a6b2-1cec563942ee",
            "name": "Security"
        }
    ]
}
Revoke a Role from an Organization
To revoke a role from an organization, send a DELETE request to the
/v1/applications/{{application-id}}/organizations/{{organization-id}}/roles/{{role-id}} endpoint.
2️⃣3️⃣ Request:
curl -iX DELETE \
  'http://localhost:3005/v1/applications/{{application-id}}/organizations/{{organization-id}}/roles/{{role-id}}' \
  -H 'Content-Type: application/json' \
  -H 'X-Auth-token: {{X-Auth-token}}'
Authorizing Individual User Accounts
Access can also be granted directly to individual users, bypassing organization membership.
Grant a Role to a User
To grant a role to a user using the GUI, select the application, click on Authorize and then select the user and role.

Alternatively, via the REST API, send a PUT request to the
/v1/applications/{{application-id}}/users/{{user-id}}/roles/{{role-id}} endpoint.
2️⃣4️⃣ Request:
In the example below, Alice is granting the Management role directly to Bob.
curl -iX PUT \
  'http://localhost:3005/v1/applications/{{application-id}}/users/{{user-id}}/roles/{{role-id}}' \
  -H 'Content-Type: application/json' \
  -H 'X-Auth-token: {{X-Auth-token}}'
Response:
{
    "user_role_assignments": {
        "application_id": "6632bb2e-c8e5-418f-ba5b-c269d8a53dd2",
        "role_id": "e39cbb11-94af-5c56-b7c3-2d2d674a53ff",
        "user_id": "bbbbbbbb-good-0000-0000-000000000000"
    }
}
List Granted User Roles
Listing roles granted to a user can be done by making a GET request to the
/v1/applications/{{application-id}}/users/{{user-id}}/roles endpoint.
2️⃣5️⃣ Request:
curl -X GET \
  'http://localhost:3005/v1/applications/{{application-id}}/users/{{user-id}}/roles' \
  -H 'Content-Type: application/json' \
  -H 'X-Auth-token: {{X-Auth-token}}'
Response:
{
    "user_roles": [
        {
            "id": "e39cbb11-94af-5c56-b7c3-2d2d674a53ff",
            "name": "Management"
        }
    ]
}
Revoke a Role from a User
To revoke a role from a user, send a DELETE request to the
/v1/applications/{{application-id}}/users/{{user-id}}/roles/{{role-id}} endpoint.
2️⃣6️⃣ Request:
curl -iX DELETE \
  'http://localhost:3005/v1/applications/{{application-id}}/users/{{user-id}}/roles/{{role-id}}' \
  -H 'Content-Type: application/json' \
  -H 'X-Auth-token: {{X-Auth-token}}'
List Application Grantees
It is often useful to see a summary of all users and organizations authorized to use an application.
List Authorized Organizations
To list all organizations authorized for an application, send a GET request to the
/v1/applications/{{application-id}}/organizations endpoint.
2️⃣7️⃣ Request:
curl -X GET \
  'http://localhost:3005/v1/applications/{{application-id}}/organizations' \
  -H 'Content-Type: application/json' \
  -H 'X-Auth-token: {{X-Auth-token}}'
Response:
The response lists each organization and the roles assigned to it.
{
    "organizations": [
        {
            "organization_id": "security-team-0000-0000-000000000000",
            "role_id": "d28baa00-839e-4b45-a6b2-1cec563942ee"
        }
    ]
}
List Authorized Users
To list all users authorized for an application, send a GET request to the /v1/applications/{{application-id}}/users
endpoint.
2️⃣8️⃣ Request:
curl -X GET \
  'http://localhost:3005/v1/applications/{{application-id}}/users' \
  -H 'Content-Type: application/json' \
  -H 'X-Auth-token: {{X-Auth-token}}'
Response:
The response lists each user and the roles assigned to them.
{
    "users": [
        {
            "user_id": "bbbbbbbb-good-0000-0000-000000000000",
            "role_id": "e39cbb11-94af-5c56-b7c3-2d2d674a53ff"
        }
    ]
}
Next Steps
Want to learn how to add more complexity to your application by adding advanced features? You can find out by reading the other tutorials in this series